For this we need:

- a food container, in this case a cylindrical one,
- fabric, synthetic winterizer, button on the leg,
- threads, needles, scissors,
- pencil, ruler, compass,
- squared notebook or paper.
The method of work.
1. Take a container and measure the diameter of its lower part.
The diameter of this container is 11.4 cm, respectively, the radius is 2 times smaller and equal to 5.7 cm.
We use the resulting measurement to build a circle. Using a compass, draw a circle on paper.
Scissors cut out the circle that we need to cut the bottom of the needle bar.

If there is no compass, you can circle the bottom of the container with pencil on paper. When using patterns, take into account the wall thickness of the container.
2. We put a circle on the fabric, chop off with needles and cut, adding an allowance of 3-5 mm.
Since the needle bar imitates a cactus, the color of the fabric is selected green.
In the future, we will use a zigzag seam, the allowance directly depends on the height of the seam. If elastic stretch fabric is used, measurements may be approximate. And if the fabric is dense and inextensible, all measurements must be extremely accurate.


3. Our needle bed will have 6 sectors that will simulate the surface of a cactus. For the pattern, we need to calculate the width of the sector and its height.
The width is calculated by the formula:
pi (3.14) times the radius and divided by 3.
3.14 x 5.7 cm: 3 = 5.97 cm, rounded to 6 cm.
If you don’t have a calculator at hand, you can add a few millimeters to the radius to get the width of the sector.
The height is taken from personal preference, but taking into account whether you want the bottom of the cactus to fit snugly against the walls of the container.
In this case, the abutment height is 1.5 cm.
The length of the bend was calculated by the formula: the desired height plus radius.
2.5 cm + 5.7 cm = 8.2 cm
We draw a pattern on paper. It turns out a triangle, the two sides of which are slightly convex.

4. We pin the pattern to the fabric with needles and cut it out. Do not forget about the allowances that we will leave at the seams.

5. We get the blank for the sector.

Cut 6 such blanks.

6. Fold the blanks of the sectors with the wrong side inside and mark them with threads.

7. On a sewing machine, we sew sectors along the face with a zigzag stitch, using contrasting yellow threads.

The result was a blank in the form of a hat.

8. Then we sew the bottom to the upper blanks, leaving a small hole for filling with synthetic winterizer.

9. Fill the synthetic winterizer blank and sew up the hole.

10. Take the prepared button on the leg and place on the fabric.

Using a pencil, circle the button, making allowances approximately equal to its radius.

11. Cut the workpiece along the drawn contour. In this case, we got a small circle.

12. Retreating from the edge of the circle 3-4 mm, stretch the thread.

13. Tighten the thread, close the button with a cloth and fasten the thread. The button leg should peek out of the fabric for ease of further sewing.

14. Place the buttoned fabric in the center of the top of the cactus.

Sew on a button in the middle of the cactus, at the same time connecting the top and bottom. Thus pulling her down.

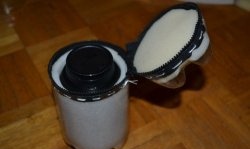
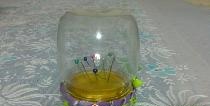
The needle bar is ready.

To ensure safety, we place it in a lockable container.

And close the lid.

Now your household can be safe from pricking needles.