For the manufacture we take the following materials:
- white fabric "Coarse calico".
- scissors.
- acrylic paints.
- thin brushes.
- PVA glue.
-instant coffee.
- a piece of foam.
- thin lace.
- gel pen.
-paper.
- a pencil is simple.
- sewing machine.
- any filler for toys.
- a needle with a thread.
Before work, we draw a lizard template, whose length is 16 cm and a width of 8.5 cm. We outline the shape and position of the eyes of the toy.

According to the cut out template, we outline with a simple pencil the main contour of the lizard along the double folded fabric. Fasten with a sewing pin and cut out with allowances for seams.

Now on one side between the legs we mark the place for filling, which we will not flash. And on the main office we do a line with small stitches. After everything is planned, in difficult turns we make notches with scissors, not reaching the seam. And now it will be possible to twist starting from the tip of the tail.

We put the template under the fabric and mark the shape of the eyes with a pencil on the lumen.

The next step in the manufacture of the toy will be its filling. We take any filler (synthetic winterizer, synthetic winterizer, holofiber) and through the left hole we seal the toy well.

When this process is completed, we carefully sew the needle with the thread, the left cut.

Further, for decoration on all the paws, we take turns making the yarn string. On each paw there are two bends and we will additionally pull them together with a thread. We pierce with a needle and thread first in the first bend, stepping back from the edge of 3-4 mm. We make several stitches in one place, we direct the thread over the fold of the fabric and pull them together. Then we pass to the second fold and also form a tightening. On each foot, three fingers are obtained.

But we have 4 legs, we form everything.

Now move on to the face. Also, we pull the nose with a needle and thread. On the upper part of the muzzle, in the upper corner, we retreat 5 mm from the edge and make a puncture 1 cm long. In this case, the thread passes inside the toy, we make several stitches in one place and tighten it not very much, we get the shape of a nose with nostrils.

And on the edge of the tail we make a loop from the thread, which we will use when tinting.

Now we will prepare the coffee solution. In a jar, pour 1 teaspoon of instant coffee, pour 3 tablespoons of boiling water, stir well and let cool a little. Then we add PVA glue to the warm solution, observing the proportions 1 \ 1 and mix thoroughly. With this solution, we paint the lizard from all sides and for the finished loop we hang it to dry for 4 -5 hours.

The dried toy changed color and became denser. We draw eyes on it with a pencil, and then circle them with a gel pen. We also put dots on the fingers.

And now we start painting with acrylic paints. We make a mixture of brown and yellow colors. We take a piece of foam and with the paint we pass along all the seams with light movements. Then along the legs, head, nose.

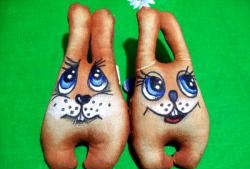
After drying this layer, draw the eyes. The narrow part will be black, then a strip of blue and a little white on top. We give time to dry. And then we put a white highlight on the pupil.

Now again with a gel pen, we correct the contours of the eyes and draw cilia.

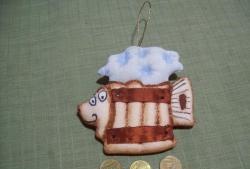
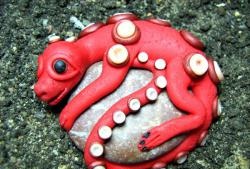
Everything has dried up and we can cut the thread from the tail, but in its place we fasten a beautiful lace. The lizard pendant is ready. Eyes can be coated with clear nail polish.

Good luck to all.