For work, we need:
1) PVA glue;
2) acrylic paints or gouache;
3) shell from raw eggs;
4) cardboard;
5) a brush for paints;
6) sharpened stick or toothpick;
7) acrylic contour of black color;
8) bugles and beads;
9) craquelure varnish and acrylic varnish if possible.
Working process:
1. We will prepare the surface for work, for this we prim the cardboard with white paint or acrylic primer.

2. A simple pencil draw a sketch of a butterfly.

3. Draw the details in the wings of a butterfly.

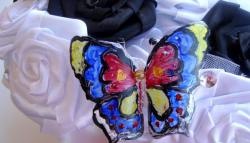
4. Orange acrylic paint begins to paint the wings of a butterfly.

5. Next, we colorize the wings of the butterfly in yellow and dark green, as shown in the photo.

6. Finish painting the wings with light green and purple colors.

7. Paint black color the body of the butterfly.

8.With the help of an acrylic contour, and in its absence - with black acrylic paint, we draw contours, thereby distinguishing the colors from each other.

Getting to the mosaic:
9. Egg shell, always from raw eggs, wash thoroughly - get a white membrane film.

10. Acrylic paint (purple, green, light green, yellow and blue) paint the shell.

11. Violet colored shells, crumbled into small pieces.

12.With the help of a toothpick and PVA glue, we begin to place the purple shell on the corresponding color segments.

13.Now we spread the light green shell.

14.Lastly lay out the mosaic on the wings of the butterfly with the help of an ocher or yellow shell.

15. We will leave some segments on the wings of a butterfly (purple and dark green) without mosaics in order to visually show the texture of the work.

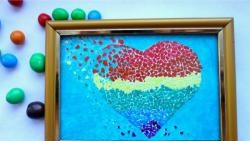
16. Make the main background of our work with the help of yellow paint.

17.To create cracks and aging effect, we will use a single-phase craquelure varnish, which must be applied to a well-dried layer of yellow paint, and put the strokes vertically on our drawing.
As soon as the varnish dries, but will still be slightly sticky, we apply blue acrylic paint on top, and put the strokes horizontally on the surface.

18. Using a contour or black acrylic paint, circle the butterfly’s body, draw legs, antennae.

19. Decorate the body of the butterfly with black glass beads, and the head with round beads.

20. If desired, the yellow shell in a chaotic manner can be glued under the paws of a butterfly, and coated with blue paint on top.

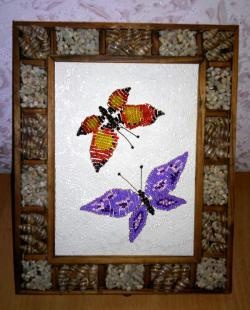
Our mosaic is ready! So, having spent some free time, you can get not only pleasure, but also a beautiful picture made in an unusual technique. We wish you creative inspiration!