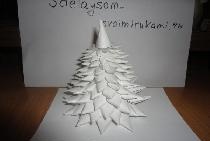
After all, even a small volumetric Christmas tree made of paper, made in the technique origami, can become a wonderful element that will complement the New Year's interior 2016 of our apartment. And it consists of only 4 parts, and is done quite simply.
Materials for creativity:
• 2 sheets of A4 paper with matching colors (we have pale blue and pale orange);
• scissors;
• ruler with a pen (or pencil);
• PVA glue (a simple glue stick will also work);
• a little tinsel - to decorate the Christmas tree.

Operating procedure:
Draw and cut out the details:


• 3 squares of blue paper with sides 12 cm, 10 cm and 8 cm. - from them we will make “branches” of the Christmas tree;
• 1 square from a sheet of the second color with a side of 8 cm. - we need it for the manufacture of the trunk (legs).
Now let's start the process of working with paper.
We are preparing the details. We bend the square in half, first vertically, then horizontally, evenly applying a corner to the corner.

Now do the bends on both diagonals.

We bend all 4 corners to the center of the figure.

We take the resulting square by the sides in the middle and shift towards each other, connecting in the center.

We do the same with the upper and lower sides of the figure. We get a cross.

We bend one of the corners of the upper layer.

We shift the previously made fold line to the side (left) side, forming a small triangle below (under the figure).

We move it by the hip of the resulting figure.

Turn the entire paper blank upside down and bend this triangle inward.

We put the workpiece in its original position, unscrew the next corner of the upper layer and repeat the same manipulations, as well as with the remaining two other corners.

We get a paper figure similar to a pyramid.

In the same way we add all 4 details of our Christmas tree.

We collect the craft. We smear the top of the orange pyramid with glue and put it about 0.5 cm into the slots on the “bottom” of the largest blue detail.


Then in the same way we glue a pyramid of a slightly smaller size and finish assembling the craft with the smallest detail.

Now it remains for us to decorate the finished Christmas tree by gluing bright strips cut from tinsel in a mess.

And our paper Christmas tree is ready to become a Christmas decoration for any corner of the office or apartment.

Enjoy your work and happy holidays!