Many people are impressed to have at home an ancient artifact in the form of a plate or a pot covered with mosaics, even this path is not an ancient thing, but an acquired copy. If the store does not have a suitable item, then you can create it yourself from simple and affordable materials.
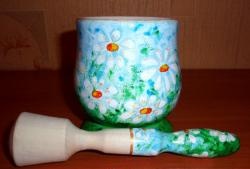
One of the original and unusual items in the kitchen is a mortar for grinding spices and seasonings. It can be an interesting addition to any kitchen utensils, and painted with a mosaic pattern will add a twist to the look of the kitchen.
Manufacturing algorithm
1. To create a painting you will need:
solid mortar and pestle
sandpaper
pencil eraser
priming
acrylic paints, varnish, brushes
plate for paints and soil
drawing paper and construction gloves are desirable but not required

2. We take the blank, sandpaper and construction gloves, remove small burrs and irregularities, grind. Sandpaper is selected according to defects on the workpiece, first we remove the burrs with a larger abrasive, then we give the smallest smoothness. It is necessary to take into account the scope of the mortar, if it will be used for its intended purpose, the surface should be perfectly even.

3. To determine the level of coloring of the pestle on his pen, draw a line with a pencil. If you make a mistake, you can use a soft eraser.

4. Using acrylic primer, coat the outside of the mortar and the top of the pestle to the line. Since the mortar will be used for food purposes, painting the inside is not recommended.
It is better to take a brush from natural bristles or nylon.

5. Using fine sanding paper we level the surface of the workpiece. In order not to injure hands, we use gloves made of fabric.

Then we wait for drying, cover with another layer of soil and repeat grinding.
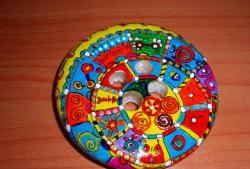
6. Draw on the workpiece any pattern consisting of closed figures. You can use paper for drawing and make a preliminary sketch.


7. Fill the drawings with fragments imitating a mosaic. Purpose: to create rectangles and triangles similar to elements of a real mosaic.

8. We color the fragments inside the picture in the bright colors we like.


9. Create the main color for the product. In this case, it is dark brown.
It is better to choose deep dark colors or vice versa bright bright ones, the mortar should radiate positive, as it is created for cooking.

10. We take the colors to match the main color, in our case it is gold and brown. Mix them to create a bronze and fill the gaps inside the picture between fragments. Use a small diameter brush.

11. Using white paint, draw glare on the painted fragments. This will give the “ceramics” a glossy sheen and volume.

12. Using the brown paint used to give the product its primary color, draw lines to limit the fragments. This will give them even greater volume, clarity and convexity. It is not necessary to draw all the lines, you can limit yourself to 2-3 within the boundaries of one fragment. It is better to take a brush of the smallest diameter, for example 1.

13. If the top edge of the mortar is contaminated with paint, remove it by grinding. We use gloves to preserve the skin of hands and nails. The gloves should be perfectly clean, since before the paint is applied, the paint collects dust from sanding.

fourteen.Using glossy acrylic varnish and a synthetic brush, we give the product shine, smoothness and keep the colors bright. Apply varnish in several layers.

So, the mortar is ready!

At first glance, the creation of such an interior item is a laborious and lengthy process, and certainly requires patience. But if you like to draw, he will enthrall you head over heels, and in the process of creativity you will gain new skills and create a unique author's thing.