01. MATERIALS. What do we need and how much?
Our salon will be combined in two colors - black and beige. Of course, you can choose any other colors to your taste. For the central parts of the seats, I chose beige perforated eco leather (2.5 m). For the back of the back and pockets - beige without perforation (1.5m). And for all other details - black leather deputy (3,5m). Choose special automotive material. It is designed for large temperature differences and is resistant to fading. Regular furniture leather deputy is not suitable, as it is designed for comfortable conditions in apartments. Still need a thin foam rubber - 0.5 cm thick. They will need to glue all the details of the skin. I have already duplicated black material. But for beige it took 3 sheets of foam rubber. Need glue, special furniture. Usually it is pink. It can be purchased at specialized stores.

02. Sewing accessories.
• Purchase special needles for leather No. 90 or 100.
• Also, threads for sewing leather will be required (ordinary ones will not work, they simply will not withstand the load). Look for threads marked Extra Strong or for the shoe industry. It will take at least three coils of 200 meters.
• 3-5 meters of adhesive non-woven - according to the amount of foam rubber and perforated material.
• Machine oil.

03. Material preparation
All foam rubber is glued with non-woven using an iron. This is necessary so that during operation the foam does not crumble. Also, non-woven fabric facilitates the sliding of foam rubber under the foot during sewing.

04. Getting started
Remove the entire trim from the seats (the seats have long been removed from the car).

05. Markup
Now, looking at the cover, everything seems clear to us. But when we cut it into parts, we can easily get confused which part comes from. Therefore, we take a marker and number each element of the cover. For convenience, I drew on a separate sheet a diagram of each seat and back and also numbered the details. Thus, it will be impossible to get confused.

06. Knitting needles
From the wrong side, you can find such "pockets" with knitting needles. These wires are useful to us for new covers. Take them out and set aside for now. Be sure to remember the sewing places of these knitting needles and mark this on your paper chart.

07. Preparation of patterns
Unzip the covers. We cut off all seam allowances. Here's what happened in the end - patterns for new covers.


08. Cutting
Each detail is transferred to the skin deputy. In order not to confuse anything and not to get parts in a mirror arrangement, we apply them to the wrong side of the material with the wrong side up. As shown in the photo.

09. Seam allowances
Add from all sides (where required) allowances for seams equal to 1 cm. Do not forget to number all the details.


10. Cut

11. We get a set of new parts for covers
In this case, this is the back seat. But in the same way we perform both the backrest and both front seats.

12. Glue
As mentioned earlier, parts made of leather zama must be glued with foam. I need to work only with beige. The black leather deputy is already ready for sewing. Ideally, you need to glue with a spray gun. But at home this is not always possible, so we apply glue with a brush or a rubber spatula.Practice trimming your material at your convenience. Please note that we stick foam rubber to the skin on the side that is non-woven.


13. Possible problem
I have a problem with perforated eco skin. When trying to glue such parts to the foam, glue seeped through the holes. The solution was found as follows - first glue the material from the inside with non-woven material, and then glue the foam rubber to it. That is, we got such a sandwich - eco leather + non-woven + foam + non-woven.
14. Getting started sewing
When the glued parts have dried, cut out and proceed with sewing. We start with the central parts of the seats (or back). We apply marking for decorative stitches.
15. Knitting needles
From the wrong side we put needles and mark where they should be (exactly in the same place as on the old covers).
16. For sewing on knitting needles, we cut out strips equal to the length of the wire from any fabric. Fold along in half and sew to the wrong side of the corresponding part.

17. We sew decorative stitches on a sewing machine, having previously lubricated the front side with oil. This is necessary so that the foot of the machine moves more easily through the material.
18. Assembly of parts
Now that all the parts are ready, proceed to assembly. We sew all the elements of the cover into one. Here we just need our paper scheme.

19. Stitch in turn all the details.

20. Clothespins
Such office clothespins can be very useful in work. We connect the parts with them to smoothly grind on the typewriter. Do not use needles or basting, as unnecessary holes will remain on the material.

21. After the parts have been machined, cut the foam rubber from the seam allowances.

22. Stitching
Turn the cover over to the front side and lay decorative stitching. Again, for better glide, wipe the front and back surfaces with engine oil.

23. Here in this sequence I grind off the details. First left and right elements in one.

24. Now grind the left and right sides together. We process the lower and upper sections, thread the cords and knitting needles that were in the old casing.

25. View of the cover from the wrong side. It remains to knock all the knitting needles into place.

26. Continue
We sew the remaining covers - on the front seats, head restraints and backrest in the same way. All over again - unzip the old skin, cut new parts, etc. I decided to change some details a little. For example, sew pockets into the back of the front seats. Therefore, I cut one whole part into several elements.
27. Result


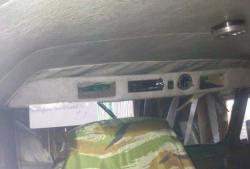
After working with all the covers we have, we get a new trim for the car seats. We pull everything into place and enjoy the work done. In the photo salon “before” and “after”.