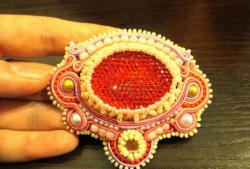
- basis for embroidery;
- beads of several colors and different sizes;
- gimp;
- strong kapron or polyester threads;
- scissors;
- a bead needle;
- marker;
- acrylic paint;
- brush;
- thick cardboard;
- fabric for the wrong side;
- brooch pin;
- glue.
A sketch can be drawn directly on the basis for embroidery, but this is only worth doing if the work is not done for the first time and before that there were no problems. For the first few times, it is preferable to first put the image on paper, or on graph paper, and then copy it using tracing paper. Having cut out the silhouette and checking the symmetry, it is necessary to cut one more of the same contour from thick cardboard. This cardboard will be placed inside the brooch and provide it with the required stiffness.

Using a marker, the contour is transferred to the basis for embroidery. As a basis, you can use any non-shedding fabric, but when working with the cantle, it is important that the basis is not fleecy. On felt traditionally used for embroidery, there is too much pile, which clings to the gimp in work, spins it and greatly complicates the process. Therefore, doubler glued in three layers was used for this brooch. So that the white fabric does not shine through the beads, it should be painted in the desired color using special acrylic paints for the fabric.

After the fabric dries, a contour of the patterns is applied. The first step is to sew on the gimlet, since its laying requires free space.

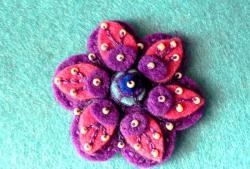
Then you need to sew contrasting beads close to the outline of the gimp, from the inside or outside, depending on the intended pattern.

There can be more than one contrasting shade of beads; colors that are close in tone when used give a good result.

Large beads between the curls are sewn at the same time.

Having finished embroidery of one wing, go to the next, but you can embroider them at the same time, if it is more convenient.

After all the curls and patterns on the wings are embroidered, fill the background with the selected small beads of the main color.

Lastly, the back and abdomen of a moth are embroidered.

This order of work is more convenient, as it allows you to make the wings more symmetrical. The embroidery cut along the contour with allowances for seams is combined with the fabric prepared for the wrong side of the brooch, inserting cardboard in the middle so that the brooch holds its shape. It is required to fix the brooch pin on the wrong side, making cuts in the fabric and additionally securing it with several stitches of thread to match the fabric.

When assembling the brooch, it is advisable to glue the cardboard with the wrong side of the fabric so that its destruction from friction during wear is slower. Cardboard should not be glued to the embroidery from the inside. Even the densest base in places where the needle pierces allows the glue to pass through to the front, and it is very easy to spoil the embroidery.Unchecked in advance on the resistance of the beads can change color from contact with the glue, the same can happen with the gimp, the silver coating often suffers.
A finished brooch can become an adornment for a coat, scarf or bag, but it should be remembered that often contact with moisture is undesirable for a tassel. When wearing on outer clothing you need to protect yourself from rain and a strong snowstorm.