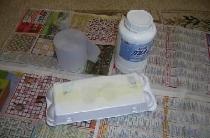
We will need:
- Several types of fabrics of different colors and materials (better stretching):
- Yellow or light green cloth: for the body and hands;
- Black: for hands, mouth. As well as a black ribbon for glasses;
- Stretch funny colors: for the clothes of the minion;
- Old knitted fabric (for dissolution) or thread: for hair.
- Five-liter plastic bottle;
- CD discs: 3 pcs;
- Velcro tape (Velcro): about 4 centimeters;
- Large bright buttons: 2 pcs;
- Clay silt tape.

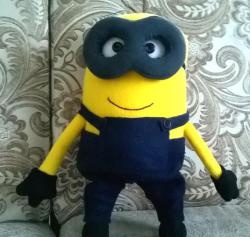
We should get not an ordinary minion, but a minion box: in it it will be possible to store some trifle.

Process of creation:
1. Prepare the bottle. At the bottle, cut off the neck and cut it in half.


We leave only 10 centimeters so that the top does not come off from the bottom.

We cut in the upper part near the middle section, 2 holes on each side.

Lower do a little more. They will be needed to attach the hair and hands of the minion.
2. The creation of the body. We measure two pieces from the yellow tissue.

Size: bottle volume + 10 centimeters for bends. Sew two opposite edges to put the “skin" on the bottle.

Sew everything to the bottle.

The fabric can not be sewn on top, as there will be hair.
At this stage, we get such a design.

3. Make a hairstyle. We took an old knitted sweater and dissolved it. This method is more convenient than using threads, since leaving a small part undissolved, we will get rid of unnecessary hassle when attaching hair.

We thread the threads through the hole in the disk: the loose one sticks in easily, but the untouched part prevents the disk from falling and this fixes the threads.

We release the hair from the inside of the bottle out.

The disk will serve as the “root” of the hair of the minion: it will not let them fall.

Now we sew the upper fabric to the bottle, at the same time we grab the fabric part of the hair (you can use the threads from the dissolution to make it imperceptible).

Fluff the threads, tie at the ends of the braids. We pass them first into the lower hole cut into the side of the bottle, then into the upper one.

It should be a kind of plaits Peppy Long Stocking.


4. Getting to the eyes.
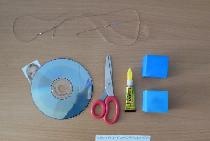
We will need:
• Colour pencils;
• scissors;
• Adhesive tape or glue;
• Tape;
• Album sheet.
Draw the eye of the minion.


We outlined a circle on the disk and stepped back from the edges about two centimeters (approximately).

This point is very important, since the rest of the disk will serve as a frame for glasses. Cut out the resulting pattern.

Glue the eye to the disk.

5. We make the frame of glasses. Here, if desired, you can use glue or scotch tape. At the time of creation, we didn’t have any “safe” glue for the child at hand, so we took tape. We put the tape on top of the disk and cover it with another.

We glue. Points are ready.

It remains only to tie on the head and sew so that the eyes do not walk on the body.
6. Next step: creating a skirt. Since we took the stretch fabric, we just sewed two edges together and the others folded. You can immediately sew buttons on the sides. They will hold the minion's outfit, and will also be required for further modifications.

7. We sew hands-holders.
Hands will play the role of a “connector” of the top and bottom, so they will look like this.

Sew the fabric to make two strips.

We draw a hand template (for minions, 3 fingers: do not forget!).

Cut out.

Sew.

We are stuffing.

We connect the strips and the hand so that the previously shown option is obtained.We attach our hands to the bottom hole (which is why it should be wider) from the side of the minion in this way.

8. The final stage: a Hollywood smile.
We will need:
• Cardboard;
• White fabric;
• black fabric;
• Tape Velcro.

Create a smile template from cardboard and sew it to black fabric.

Sew on one side Velcro.

On the other hand, we make teeth from white fabric (for the effect of the teeth, we just pulled the fabric a little bit in some places with black thread).

Sew the other part of the Velcro to the body of the minion to make additional fastening. Sew the top of the smile to the body itself.

It turns out here is such a cute, toothy smile.

Well, our minion is ready.


By the way, we were inspired to create a cute disguised minion by looking at the drawing.

Good luck