For work, we need the following materials:
- two tall glasses.
- plastic suede in pink, dairy and green.
- 80 cm of green ribbon 0.5 cm wide.
- glue gun.
- floristic wire.
- iron.
- scissors.
- Moment glue.
- wet wipes.
- toothpicks.
- tweezers.
- glue with sparkles for children's creativity.
- a dry bed of raspberry, yellow and purple.
- Ready-made stamens for flowers or home-made.
- corrugated paper.
To start, let's draw patterns of future colors. For one glass, the twig will consist of 1 anemone and two large leaves, you still need 10 hydrangea flowers in diameter of 4 cm and 8 thin leaves. And the anemone consists of 2 hexagons, one in diameter 6.5x6.5cm, the second 7x7cm. Leaves for anemones are 8x7 cm in size, and for hydrangea we take a 5x8cm rectangle. Then you need 2 strips measuring 1x16 cm and the second 10x2 cm.

Take a pink foamiran and cut out two six-year-olds, two strips. From plastic milky suede we cut 10-12 four-leafed leaves, and from green suede we cut a triangle and two sheets.

We all cut to fit for one glass. Now proceed to coloring the petals. We take a dry bed of raspberry color and with a finger on which we put a wet towel, we collect some paint and tint along the edges of the leaves on both sides. Given that the paint will come off a bit during further processing of the workpiece.

We tint with a crimson color and a thin strip, and a wide one we will tint with purple. On green leaves, we also pass along the edge with a damp cloth with raspberry bed. But on small flowers, made of milk foamiran, we tint only two midpoints on both sides with yellow.

Now you need to cut the green rectangle into 8 parts, similar to a high triangle. On the pink strip we make the teeth like a saw. But the purple blank should have a fringe. It is necessary to cut thin strips, but without cutting to the edge.

Turn on the iron to the second position or wool. We apply a strip of teeth to the heated surface, they will take a slightly different shape from heat.

We also process purple fringe in the same way.

But after the iron, it is desirable to tighten the edges of the fringe with your fingers and they will become thinner and shaggy.

It is time to give the petals anemones a new shape. It is also necessary to attach to the iron a little and quickly fold, in three steps, to get all the petals on top of each other.

Now gently scroll all the edges of the petals with your fingers, thinning them, then straighten them a little.

We continue to work on the petal. It is necessary to carefully stretch each leaf of the petal in the middle with fingers with fingers.

And tighten the tips of this workpiece themselves a little more. So we process both petals.

Green big leaves also give a new shape. We apply to the iron for a few seconds, and then draw strips with the edge of the tweezers, pressing on the sheet. To make the strips better, you need to put the sheet on a fabric folded several times.

And again with our fingers we complete the creation of a new form, making indentations along the edges and in the middle.

Now the leaves are ready.

Getting to the petals of hydrangea. We stack one at a time, and if possible, then two at a time, between corrugated paper. We take the iron and warm it through this paper, just press it with the iron. Then, additionally, press with your fingers. The petals get interesting stripes.

After ironing, we also fold all the petals into one.

Just as in the previous petals, we twist, but not much in these colors. And straighten, making a recess in the middle of the workpiece.

We give a new form to all such petals.

And green thin leaves do a little scroll from a thin edge. Just folding it all together, turn it several times with your fingers.

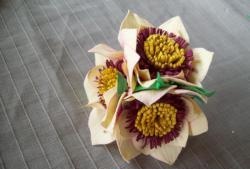
Getting to the assembly of anemone flower. We take a piece of floristic wire with a diameter of 0.8 mm and a length of 8 cm. On one edge we make a small loop-bend.

Turn on the glue gun and gently fix the strip with cloves, glue by turning them up. We fix the entire strip on the same level.

Now take the purple fringe strip and glue it over the first strip, observing evenness from the bottom. These will be the stamens of the flower.


Using glued stamens, we pierce the center of a small pink petal.

Glue it down the stamens, just lift it up the wire.

We attach the second anemone petal in the same way, but press it to the first so that the petals are staggered.

Now turn the flower upside down with the wire, and put the green leaf on the flower, piercing the wire backing 1 cm from the wide part of the leaf.

The second sheet is also punctured and glued, tilting them closer to one side.

The flower is ready. Two small details remained. The first of these is the decoration of the second stamens with glitter glue for children's creativity.

Now take the green corrugated paper.

Using the “Moment” glue, we fasten this tape along the entire wire.

We begin the assembly of hydrangea sprigs. Take the stamens.

We cut them in half and fix with a glue gun on the back of the flower so that the stamen is in the middle of the workpiece about 1 cm high. First, with a toothpick, make holes in all the small petals.

Glue the stamens to all the milk-colored petals.

Now we take again the 8 cm wire, a strip of corrugated paper. We attach the edge of the wire and two flowers for the edges of the stamens to the edge of the strip with glue “Moment”.

Having made two scrolling around the wire with a tape, we fix a thin green sheet.

So we continue to alternate flowers and sheets, all fixing corrugated paper.

When it remains to the edge of the wire 3 cm, then you need to attach anemone flower to this place. But first, the wire on the flower needs to be bent. We retreat 1 cm from the leaves, tilt the wire down.

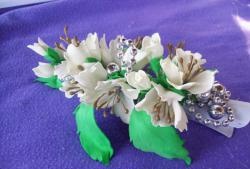
And all together we glue the green ribbon. You can stick the remaining small petals. The twig is ready.


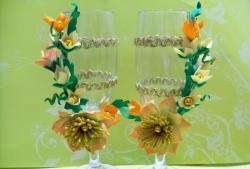
Now we take the finished twig, 4 remaining flowers of milky color, a 40 cm green ribbon, 0.5 mm wide, and the glass itself.

Take the moment glue. We lubricate the leg of the glass with them, apply a twig, straightening the wire. And then we wind it with a beautiful green ribbon, pressing it well to the glue. And it remains to fix two small flowers at the beginning and at the end of attaching the ribbon to the stem of the glass.

All the glass is ready, it takes time to dry. But we have glasses of steam, so we decorate the second glass in the same way, we only take into account the slope of the twig. On one glass, one way, and on the other, the other side of the anemone.

Good luck to all.