We bring to your attention two miniature soldering irons, the most affordable in manufacturing and satisfying the requirements for the installation of miniature electronic products.
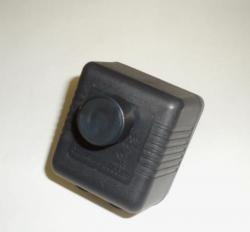
The first design, shown in Figure 1, is intended for mounting transistors and microcircuits on printed circuit boards. The power of the soldering iron is about 7 watts. Supply voltage 6.3 V.
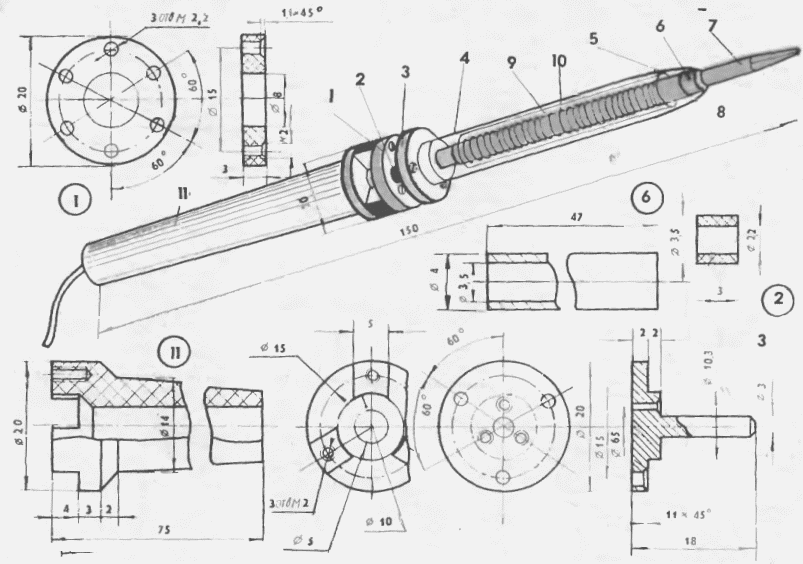
In figure 1, the numbers indicate: 1 - washer 2 - sleeve; 3 - base: 4 - cap; 5 - fiberglass; 6-tube; 7 - a sting; 8 stopper; 9 - asbestos thread; 10 - heating coil; 11 - pen.
The design of the soldering iron is traditional. A copper tube is attached to a handle made of insulating material, into which the sting is pressed. 2-3 layers of fiberglass are wound on a copper tube, along which a heating spiral is wound. Outside, the spiral is insulated with asbestos thread. The entire heating element is closed with a metal cap from a multi-rod ballpoint pen. The assembly of the soldering iron is made in this sequence. The tube is heated with a powerful soldering iron and pressed onto the shank of the steel base. For greater reliability, drill a hole with a diameter of 0.8-1 mm in the place of attachment to the tube and rivet a piece of steel wire or nail in it. Two layers of fiberglass with a width of 40 mm and a nichrome spiral are wound on the tube. The spiral is a nichrome wire with a diameter of 0.35 mm (electric iron spiral) with a total resistance of 5-5.6 Ohms. The beginning and end of the winding is twisted with intermediate lengths of 100 mm long copper wire with a diameter of 0.6 mm. The beginning of the winding is fixed on the tube as close as possible to the sting and a nichrome wire is wound with a pitch of 0.3 mm. Then a thin asbestos cord is wound around the heater.
The washer is screwed to the handle and a power cord twisted from three insulated flexible conductors is passed through the hole in the handle and the washer. They are passed through three holes in the base and screwed to the washer by installing three bushings. The insulation at the passage through the holes in the base should be further strengthened with two to three layers of fiberglass. One of the wires with a brace of bare copper wire is attached to the shank of the base, this conductor is used to ground the tip of the soldering iron during operation. The remaining two are designed to connect the heater to a current source. A protective cover is put on the heater and fixed with a stopper made of a spring wire.
The transformer for powering the soldering iron must have good inter-winding insulation. The secondary current is about 1 A.
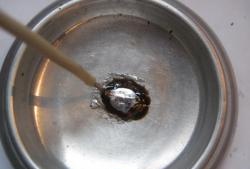
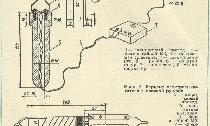
A feature of the second design (Fig. 2) is the device of the heater, it is made of graphite and screwed directly onto the tip of the soldering iron. The design of the soldering iron is very simple. The sting is made of a copper rod with a diameter of 5 mm and a M5 thread is cut into it. Screw the nut onto the thread until it stops and put on a metal washer (Fig. 4). Then put on a mica pad with a thickness of about 0.5 mm and carefully screw the heater.

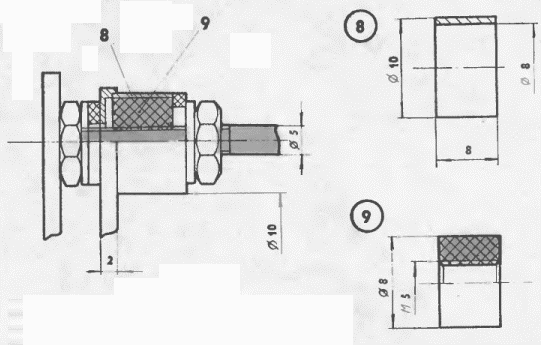
In figure 2, the numbers indicate: 1 - pen; 2 - bracket; 3 - sting; 4 - mica gasket; 5 - heater in the assembly; 6 - petal; 7 - mica pad; 8 - tube; 9 - graphite rod.
The heater is made as follows. A graphite cylinder is tightly inserted and stitched flush with the edges of a segment of a copper tube. Graphite can be used from galvanic cells or collector brushes of an electric motor. A hole with a diameter of 4 mm is drilled along the axis of the cylinder and the M5 thread is carefully cut.When screwing on a sting, the thread undergoes significant wear, so it is necessary that the thread on the sting is clean enough and its length is minimal. The heater is screwed all the way into the mica pad. Then, put the petal washer on the sting so that the copper tube of the heater enters the recess of the petal, and put on the second mica pad, the second metal washer, and tighten the whole bag with the M5 nut. The sting with a heater is fixed to the bracket with the same nut. A 3.5 mm thick steel bracket is attached to the handle of the soldering iron with screws and serves as a heater conductor. The second conductor is screwed to the petal washer.
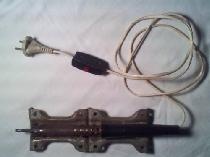
The working voltage of the soldering iron is about 1 V, the current is about 15 A. The soldering iron is powered from the network through a step-down transformer. Due to the fact that the heater current is significant, the lead-in flexible conductors must have a cross section of at least 3x3 mm. The tip heating time to the working temperature does not exceed 2 minutes. If you increase the heater current, you can reduce the heating time to a few seconds. The soldering iron is very durable because its heater is heat-resistant and practically insulated from oxygen.