A solar battery is a device for converting solar energy into electricity. The high-performance solar cells you can buy at Radio Shack and other stores are made from specially processed silicon and require huge factories, high temperatures, special cleaning and a lot of money.
If we are willing to trade efficiency for the ability to make our own kitchen solar panels using hardware store materials, we can demonstrate a working solar panel in about an hour.
Our solar cell is made of copper oxide instead of silicon. Copper oxide is one of the first materials in which scientists discovered the photovoltaic effect, in which light causes electricity to flow in the material.
Thoughts on how to explain the photoelectric effect is what led Albert Einstein to the Nobel Prize in Physics and to the theory of relativity.
Materials.
1. A sheet of copper from a hardware store. It usually costs approximately 150 rubles. for 0.9 square meters. We need approximately 45 sq. cm.
2. Two alligator clips.
3.Sensitive microammeter that can measure intervals between 10 and 50 microamps. Radio Shack sells small multimeters with an LCD monitor. But you can use a regular one.
4. Electric oven. My kitchen stove is a gas stove, so I bought a small single-coil electric stove for about RUB 750. Small 700 watt burners probably won't work - it takes at least 1100 watts to get the burner to turn red.
5. Plastic bottle with the neck cut off. I used a 2 liter mineral water bottle.
6. Table salt. We will need a couple of tablespoons.
7. Tap water.
8. Sandpaper or drill with such an attachment (abrasive)
9. Sheet metal.
Manufacturing.
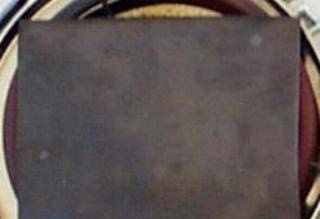
Here's the burner.
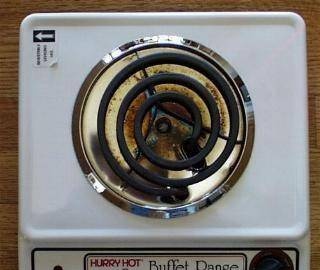
First you need to cut off a piece of copper so that it is the size of an electric stove. Wash your hands so as not to leave greasy or other stains. Also wash the copper sheet with detergent to remove any grease or other stains. Use sandpaper or an abrasive brush to completely remove the copper protective coating so that any sulfide or other light corrosion is removed.
Then place a clean copper sheet on the stove (electric) and turn it on to maximum.
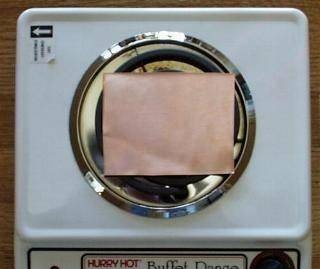
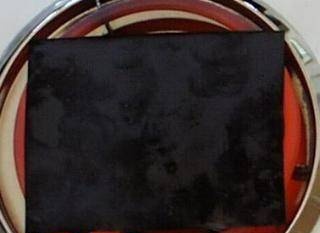
The copper will begin to heat up and oxidize, you will see beautiful red-orange spots on its surface.
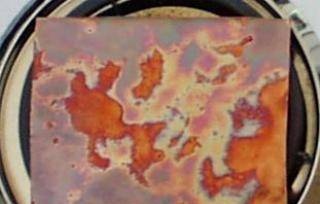
When the copper heats up even more, the multi-colored spots will begin to be replaced by black copper oxide.
All colors disappear when the spiral is already red.
When the burner glows, the copper sheet will be coated with black copper oxide. Let it cook for another half hour so the black coating will be thick. This is important because a thick coating will peel off easily, while a thin coating will remain stuck to the copper.
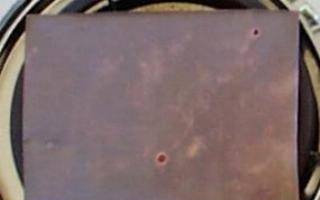
After half an hour of cooking, turn off the burner. Leave the hot copper on the burner to cool slowly. If you cool it too quickly, a black oxide film will stick to the copper.
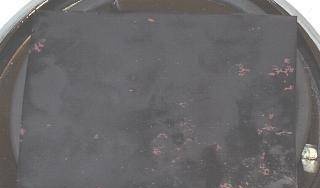
As copper cools, it contracts. Black copper oxide also shrinks. But they shrink at different rates, which causes the black copper oxide to flake off.
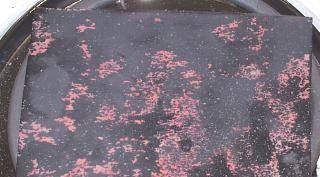
Soon large pieces will begin to fall off, it’s funny to watch))

Once the copper has cooled to room temperature (this takes approximately 20 minutes), most of the black oxide film will be gone. A light scrubbing with your hands under running water will remove most of the small pieces. DO NOT try to remove stubborn spots and do not bend the sheet - you may damage the thin layer of copper oxide, which is exactly what we need.
The rest of the assembly is very quick and easy.
Cut the second sheet of copper to the same size as the first (heated one). CAREFULLY bend both parts so that they fit into the plastic bottle without touching each other.
Attach alligator clips to both plates. Connect the wire from pure copper to the positive, and the wire from the oxide plate to the negative.
Now mix a couple of tablespoons of salt in a little hot tap water. Stir until all the salt has dissolved. Carefully pour the mixture into the bottle (where the plates are), leaving about 2.5cm from the edges of the plates.
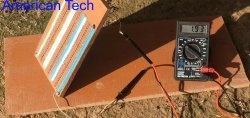
In the photo above, the finished solar battery is IN THE SHADOW, the ammeter shows approximately 6 milliamps. But even in the dark, this battery will produce several milliamps))
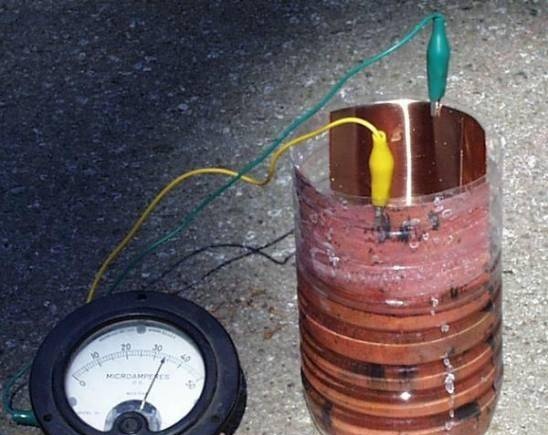
This photo shows the battery in the light, and the ammeter shows 34 milliamps, sometimes the battery can give 50 milliamps, or even more.
How it works?
Copper oxide is a semiconductor.It is an intermediate conductor, where electricity can flow freely, and an insulator, where electrons are tightly bound to their atoms and do not flow freely.
In a semiconductor, there is a gap called the bandgap between electrons that are bound tightly to the atom and electrons that are further away from the atom, which can move freely and conduct electricity.
Electrons cannot remain in the band gap. An electron can only give a little energy and move from the nucleus of an atom into the band gap. The electron must gain enough energy to move further from the nucleus, outside the band gap.
Likewise, an electron outside the bandgap cannot lose a little energy and only fall a little closer to the nucleus. It must lose enough energy to fall past the band gap into the region where electrons can escape.
When sunlight strikes electrons in copper oxide, some of the electrons receive enough energy from the sunlight to jump past the band gap and become free to conduct electricity.
The free electrons move into the salt water, then into the clean copper plate, into the wire, through the ammeter, and back to the oxidized plate.
As electrons move through the ammeter, we see work(amps). When a shadow falls on a solar panel, the electrons move slower and the milliamps are lower.
A note about energy.
The battery produces 50 milliamps at 0.25 volts.
This is 0.0000125 watts (12.5 microwatts).
Don't try to light a light bulb))) it would take acres of batteries to light up a house. Our model is experimental and can be used as a light sensor.
0.0000125 watts (12.5 microwatts) for a 0.01 square meter battery, or 1.25 milliwatts per square meter.To illuminate a 100-watt light bulb, it would require 80,000 square meters of copper oxide for the sunlit side, and 80,000 square meters of copper for the dark electrode. To run a 1,000-watt furnace, you would need 800,000 square meters of copper oxide, and another 800,000 square meters of plain copper, or 1,600,000 square meters all together. If it were to be mounted on the roof of a house, each house would be 282 meters long and 282 meters wide, taking into account everything they needed electricity for, there was one stove.
There are 17,222,256.7 square feet in 1,600,000 square feet. If copper covered costs at $5 per square foot, the copper alone would cost $86,110,283.50 USD. Doing this one tenth the thickness can reduce this to $8,611,028.35. Since you are buying in bulk, you could get it for half that, or about $4,300,000.00.
If you used silicon solar panels costing $4 per watt, you could run the same furnace for $4,000.00. But the panels would only be about 10 square meters.
Or for about a dollar you can build a solar oven out of aluminum foil and cardboard. For about $20 you can build a very nice polishable aluminum parabolic solar cooker.
Flat solar cell
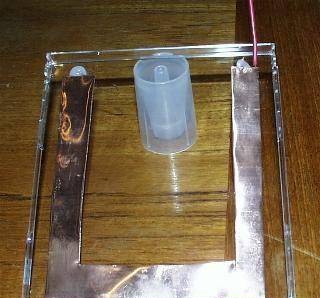
I made a more portable version of the solar panel in a flat design. I used a clear plastic CD cover as a window and silicone glue to both hold the pieces together and isolate them from each other.
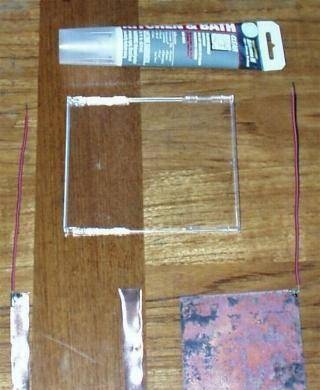
First, we make an oxide from copper, as in the first part. We solder an insulated copper wire to the corner of the oxide plate, this will be a minus (negative pole).
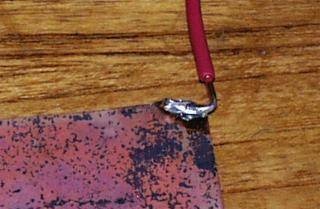
The positive plate is a U-shaped piece of pure copper, slightly larger in size than the oxide one (you will understand how in the pictures below))) we solder a wire to its corner, this time a plus.
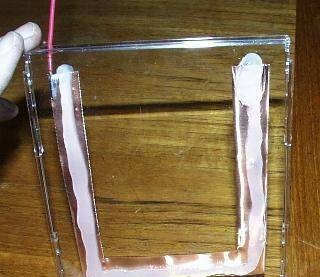
First we glue the copper plate U to the plastic window. Use plenty of silicone glue so the salt water won't seep through. Make sure the solder joint is either completely covered with glue, or outside of the U glue as shown in the photo (fully covered with glue is better).
The photo below shows the back side of the solar panel (the side not facing the sun).
The photo below shows the front side of the solar panel (the side that will face the sun). Note that the silicone glue does not completely cover the copper, since some of the copper must ultimately be in contact with salt water.
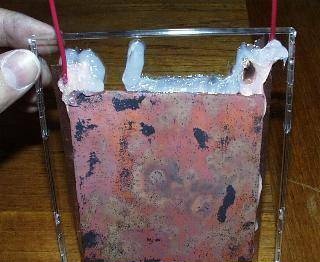
Apply glue to a pure copper plate. This layer will act as an insulator between the pure copper plate and the oxide plate, and should be thick enough to leave a small space for salt water. Again, not all the copper is coated, so there will be a lot of copper in contact with the water.
Carefully glue the oxide plate onto this layer. You want to press hard enough to make sure the glue surrounds any gaps, but not so hard that the two plates touch.
The photo below shows the back side of the solar panel (the side not facing the sun).
The photo below shows the front side of the solar panel (the side that will face the sun).Note that I added extra glue to form the pipe on top to resemble pouring salt water.
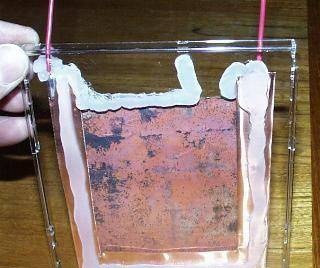
The photo does not show the additional coating of glue around the perimeter to prevent water from leaking in, but you have to do it. Let the glue dry before moving on to the next step.
Next, use a large dropper to add salt water. Fill the battery almost to the top of the copper plate until the water almost flows out. Then seal the hole with a drop of glue and let the glue dry for at least half an hour.

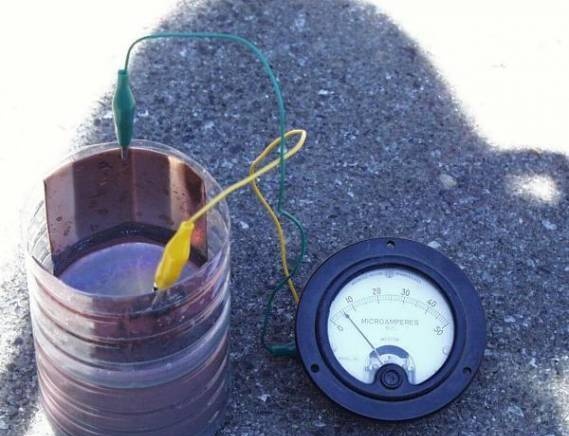
In the photo above you can see the flat panel solar panel in action in bright sunlight. It gives approximately 36 microamps. You can also see an extra bead of glue around the edges of the plates, and filling the top of the pipe.
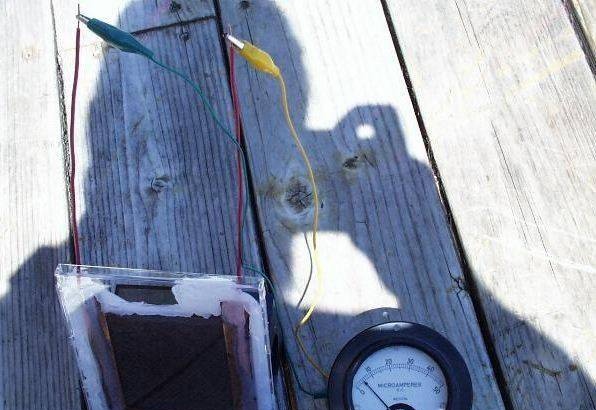
Finally, in another photo there is a shadow of the author. Note that the ammeter now reads approximately 4 microamps since no sunlight is shining on it.