DIY do it yourself
Master classes, instructions, useful tips, recipes.
» » »Elimination of fogging of the toilet bowl
Encouraged by this work condensate on the toilet flush cistern, a constant puddle beneath it, and the fight against it by putting and squeezing a rag. Condensation occurs due to the temperature difference in the room and the cold walls of the tank itself, as the water supplied for flushing is usually cold. Searches in the open spaces of Google and Yandex led to nothing - everywhere the same thing "... poor ventilation and pour warm water into the tank ...". After all, it's simple - install a layer of waterproof insulation on the border of warm and cold, and tell the condensation ciao! Unfortunately, I stumbled upon your site after I made this alteration, so I can’t provide detailed photos, (I’ve been using this revision for more than a year, I’ve been satisfied with the result more than (!), So I’ll try to tell you as much as possible about the work. To eliminate condensation, you will need a minimum of costs , and a little accuracy.

The following tools and materials were used:
1. Clerical knife, scissors, tape measure, wrench and head for 10.
2. Foamed polyethylene, thickness 8 - 10 mm., 1 mp (used as insulation and sold in any hardware store)
3.Sanitary silicone sealant.

tool


We start by removing the flush tank. We turn off the water supply, unscrew the hose that supplies water to the tank, using a wrench and socket (mounting options are possible), remove the tank from the toilet bowl by 10. Next, remove and unscrew all flushing equipment inside the tank. We wash the tank from the inside with any detergent, wipe it dry and set aside the tank to the side to dry well. Now it’s the turn to prepare the patterns of our liner in the tank of foamed polyethylene (hereinafter referred to as VP). Lay out the VP on the floor, place the tank as it stands on the toilet shelf. Circle the bottom outline of the tank bottom from the outside, cut the workpiece with scissors.

cut the workpiece with scissors


Insert the bottom blank into the inside of the tank, and carefully pressing it around the perimeter, outline the VP again so that the VP lies on the bottom with a small gap in relation to the vertical walls of the tank. Next stage. We measure the height of the tank wall from the inside with a tape measure, from the cut bottom insert to the upper edge of the tank, subtract 2-4 cm from the resulting size. In order to be able to reinstall the top cover with a button during final assembly. Also, from the inside, we measure the perimeter of the VP workpiece for the walls, while making an arbitrary allowance (about 10 cm.) For a more accurate trim.

cut the workpiece with scissors


We put the VP for the walls inside the tank and, gently pressing it along the inner surface, use a clerical knife to make a through cut of the double VP at the junction.

cut the workpiece with a knife


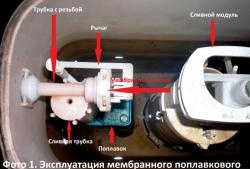
Next, we begin the assembly. Zigzag the sealant to the bottom of the tank, around all the holes for the fittings (no holes need to be cut yet!) And put the bottom liner from the VP into place. Be sure to apply a sealant around the perimeter between the bottom liner and the side walls. Then apply, also with a zigzag, sealant on the side walls of the tank and carefully insert and straighten the inner liner from the VP, be sure to pass the silicone along the vertical joint. Now that both parts of the VP are in place, thoroughly pass sealant at the junction of the bottom of the VP and the side, because the FULL SEAL between the liner and the tank is important to us. And now you have to use the toilet for a day with a bucket of water, the silicone should dry for at least 24 hours. But it's worth it. After the silicone has dried out, you can begin assembling and installing our insulated tank in place.Cut all openings for internal fittings with a clerical knife, before installation, pass sealant along the edges of the holes (do not forget about the mounting bolts) and install everything in its place, including the tank itself. Before starting the water, if possible, give the tank another 1.5-2 hours to dry the sealant. IMPORTANT! Adjust the water level below the glued liner! In addition to drying time, the work took 1.5 - 2 hours. That's all.

set the workpiece

sealant

Eliminating fogging of the toilet bowl

Eliminating fogging of the toilet bowl
come back
Comments (6)
  1. feelloff
    #1 feelloff Guests January 14, 2015 08:30
    1
    And I just switched cold water to hot. Now flushing is warm (we rarely have hot) and there is no fogging or condensation. Plus, the winter is warm in the toilet))
  2. Evgeniy
    #2 Evgeniy Guests January 14, 2015 15:12
    0
    Quote: feelloff
    And I just switched cold water to hot. Now flushing is warm (we rarely have hot) and there is no fogging or condensation. Plus, the winter is warm in the toilet))

    I agree, you can. : fellow:
  3. Ivan
    #3 Ivan Guests January 16, 2016 13:34
    2
    I do not agree, because hot is 2.5 times more expensive than cold. And now almost everyone has counters. But wrapping a hose around a hot pipe and feeding it into a tank can and will save. Although there is a lot of water in the barrel, I don’t think it will help.
  4. Evgeniy
    #4 Evgeniy Guests February 8, 2016 17:23
    2
    As the author, on the 3rd day I did not drop a drop of condensation on the tank, I hope it will continue and will not leak under the heater over time, I did not spare the sealant, the whole bottle went away, thanks for the idea, otherwise there was a real trouble with this tank.
  5. Estimator
    #5 Estimator Guests July 21, 2017 11:34
    2
    Evgeniy,
    Good afternoon. Write a little later. How does the tank behave at present? How is condensate doing? Has it completely disappeared? Please, unsubscribe. I want to make my men do this. Condensate also tormented the dampness in the bathtub.
  6. Guest Sergey
    #6 Guest Sergey Guests April 26, 2019 16:11
    0
    It is unrealistic to stick in one strip in one strip. Most tanks have uneven geometry. Made at home from three pieces of sidewall. In winter, we'll see how effective it will be. Thanks for the article, everything is very clear and intelligible.

Read also

Error codes for washing machines