Necessary materials. So, to create the crown, we need:
• A small piece of old linoleum (or any other elastic material that holds its shape well).
• A piece of white fabric (for the wrong side of the crown). It is better to take cotton material so that the contact of the head with the crown does not cause allergies and is pleasant.
• Sharp scissors or clerical knife.
• “Hot” gun (can be replaced with another glue - “liquid nails”, “Moment”).
• Decorating elements (sequins, snowflakes, beads, etc.).
• Contour for drawing (it is better if it will be with sparkles).
• Not wide silver braid “bindweed”.
• Hat (or regular elastic) - for attaching the crown to the head.

All the necessary materials are ready, you can proceed!
Determination of size and shape. First, decide on the shape and size of the crown. This can be done using a regular newspaper sheet. Draw the alleged crown on the newspaper, cut it out and attach it to the head (yours or your child’s, it depends on who this headgear is for). It is better if the crown will have high and low teeth imitating snow "peaks". Using a paper blank is convenient in that it can be easily adjusted with scissors. Transfer of crown patterns to linoleum. When the shape and size are determined, with the help of a felt-tip pen, pen or marker, we outline the resulting blank on linoleum and cut it out using scissors or an office knife. You can use the finished shape and size for the average head of an adult. Length - 39-40 cm. The height of a large tooth is 20 cm, the size of small protrusions is 13 cm. This is how the future crown looks from the wrong side.

Decoration of the inside of the crown. In order for the crown to look aesthetically pleasing from the inside, you need to take cotton fabric (preferably white), cut to the size of the crown (without allowances) and stick it to the wrong side with a hot gun.

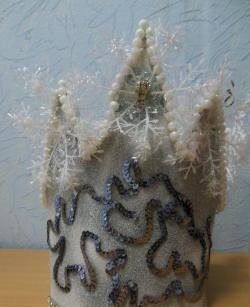
Decoration of the outer part of the crown. Now the most interesting thing is decorating the outside of the crown. Here you can include all the riot of your imagination. You can use what is beautiful at hand - beads, rhinestones, sequins, buttons. The only limitation is that the theme of the decorating elements should be related to the winter time of the year. You can offer this kind of decoration.

Now you need to close the "ribs" of the crown, using a silver "bindweed". Without cutting the tape from the “ball”, gradually, step by step, you need to glue the braid in small sections to the surface of the crown, tightly pressing it.


To give shine to the crown, you can use the special contour of drawing on glass, creating intricate patterns.


After drying, this contour loses its white tint and acquires a beautiful blue-green-golden shine.

Crown fastening. It remains to attach a hat (or regular) elastic, so that the crown is firmly held on the head. Slightly departing from the lower edge of the crown, you need to make a hole for attaching the elastic. You can use an awl, punch or simple scissors. Insert the elastic by adjusting its length to the required head size.


That's all! Just a few hours of creativity, a minimum of materials and a wonderful hat for the character of a fairy tale is ready.