Increase the pattern to the size of the foot in 4 cm and transfer to the fabric. I recommend a soft fabric such as fleece or knitted fabric, you can take an old children's blouse or t-shirt.

Cut out all the details.

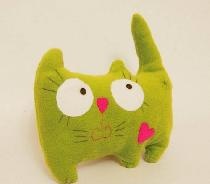
Attach the pink pads on the paws, and the nose, darted and tongue on the muzzle.

We proceed to knitting the back of an ordinary stocking viscous. To do this, it is advisable to take yarn such as weed, large knitting needles of at least No. 7, dial 28 loops and knit 40 rows.

You should get a rectangular canvas the width of the back of a cat.

On the tail, it is enough to dial 9 loops and knit a length like a back. The tail is ready, you don’t need to sew it in, it will fold well, it will be plump and mobile. All this took me 50 g of yarn.

Now we begin to open the back and tummy. I took a fleece on my tummy, and its size should coincide with the back you tied in a straightened form, so that when you stitch everything can be captured in a seam. Also, for laying, cover two parts from any fabric or synthetic winterizer, or, like me, from batting. This is necessary for greater rigidity.

Lay the knitted back on top of two layers of fabric and quilted in several places so that then the knitted part does not move away from the back of the cat, the yarn can stretch.

Sew all the paws and head.

Turn to the front side.

Fill loosely with your paws; you can tighten your head.

For stuffing my head, I made a cut in the back, it still will not be visible in the finished product.

The back of the head can simply be sewn over the edge, but I wanted to make the muzzle even more. So I sewed a patch, it will be invisible in the finished pillow.

For one cat, I fixed the finished eyes with glue crystal-moment.

And the second cat decided to attach other eyes. First I embroidered cilia.

And then glued little eyes, they move when turning. I liked these a lot more. You can come up with something else, such as buttons.

Getting to the assembly. We attach the tail correctly so that its folding side lies down, knitters know about the property of twisting the hosiery.

We control ourselves whether the tail was attached correctly.

In this position, we sew the legs, however, they can be sewn along the body. First on one side, then on the other, leaving on the side a sufficient opening for stuffing.

In this hole we fill the cat, who wants what. I made stuffing with foam rubber. You can synthetic winterizer, holofiber, woolen residues, knitted trimmings. Batting will not allow the pillow to be uneven.

Sew a side seam over the edge. We fix the cat's muzzle with threads on the side so that it does not interfere with the baby’s head, sometimes snuggling on a pillow.

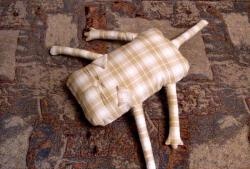
Here is a cat’s side view.

We decorate it with a bow, and he is ready for children's games.

I made the second cat at the same time.

And so they met!

And we went free swimming around the apartment.