1. Light green cardboard.
2. Paper for quilling - black, red, white.
3. Colored paper light green.
4. Cardboard or the basis for a postcard 15x15 cm green or dark green.
5. Foam tape.
6. Special quilling tool, glue, tweezers, scissors.
Preparing the foundation
Take a light green cardboard, cut out a 14x14 cm square from it. Using double-sided tape, attach it in the center to the base. We cut out the “tubercles” from light green paper, which will also be 14 cm wide. Next, we attach these “tubercles” to double-sided foam tape below the light green surface. Then you can begin to complete the details of which our postcard will consist.
Make ants
To do this, take paper for quilling (5 or 3 mm). To complete the body of one ant, we need to make three parts and three strips of paper for the paws. To complete the head we take paper for quilling (15 cm), then with a special tool for quilling we roll and dissolve a bit and attach the shape as in the photo. If you don’t have a special tool, then you can easily use a toothpick by wrapping quilling paper on it. In the same way, we carry out the middle element of the body of the ant, for which we need paper 5 cm long, and for the last element of the body we take paper 20 cm long. Each element can be immediately made in three.
Now we perform the paws: you need to cut along the quilling paper so that the paws look neat. We carry out nine segments of 4 cm in length each and bend each in the middle. Next, we bend each half in half, and at the end of the segment we perform another small bend so that the ants' paws are as believable as possible.
White quilling paper is essential for making eyes. Similarly, cut the paper along. This is necessary for the subtlety and accuracy of quiet parts so that they do not look massive. It will be enough 2 cm of this paper to complete one eye. We make six such small rolls and fix them with glue.
Now we connect the parts so that we get three ants. First we take the head, glue the pre-prepared and correctly bent paws to it, then attach the middle roll of the small body to the glue, then two pairs of paws, and in the end - the majority of the body. Glue the eyes.

Postcard inscription
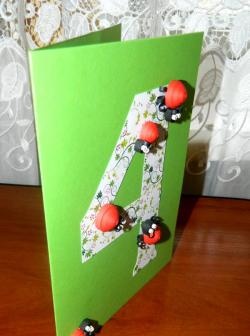
To complete the letters we take red quilling paper. For the letter “I” we need two pieces of red paper 5 cm long and one 3 cm long. We fasten the short segment with glue and tweezers to our postcard, and twist the other two segments on both sides and glue the existing strip on the top and bottom.

To make a heart, you need to take the same red paper 10-12 cm long, bend in half and twist the ends. Then form a heart and in this form stick it next to the first letter “I” so that the heart is in the middle of the card. To complete the letter “U” you will need red quilling paper 15-18 cm long, from which you should form a letter by twisting the edges with a quilling tool or a toothpick.Then carefully attach the letter to the base of the card. In the same way, you can execute any other inscription that you want.
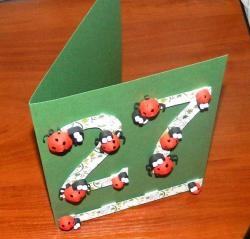
Original and unusual do-it-yourself postcard "Ants" is ready!