For work, we need:
- A cup without a picture.
- Napkin for decoupage.
- Acrylic paints of different colors.
- White outline for ceramic or universal.
- PVA glue.
- Scissors.
- Varnish for ceramics or any decorative work.
- Empty waste cup or lid.
- A medium-sized brush and another small thin one.
- Fleece.
- Alcohol or any degreasing agent.
- Hair dryer.

First you need to treat the entire cup with a degreasing agent in order to remove all the stains on it. Take a spray on a cup or cotton wool with alcohol and wipe the entire cup. Now, you need to take the cup carefully so as not to leave fingerprints on it.

Then we take a napkin with the picture we like and cut out the fragments of the picture with scissors. The napkin consists of three parts and we need to remove two unnecessary layers and leave only the last layer with the printed pattern.


Pour some PVA glue into an empty glass and dilute it with plain water. Water needs just a little bit. We will stick our napkin on this composition.

We place a napkin on the cup and, starting from the center, glue a napkin in a small piece. The brush should be well moistened in the glue. And when we brush we try several times in one place not to rub, otherwise the napkin is very thin and can break.

Take a hairdryer and start to dry the cup. PVA glue dries in just five minutes. When the glue dries, the napkin becomes dull and needs to be given brightness and color. To do this, I took acrylic paints and started painting over bullfinches and spruce branches. After coloring, also dry the cup with a hairdryer.

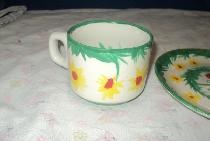
Now I took the white outline and randomly made “hooks” and “dots”. Since I have a red cup and bullfinches also the same color, I needed some kind of decoration between the colors and now, as it seemed to me, the white color fit perfectly. If you have a white cup, then there will be no need for any decoration.

The circuit was also dried with a hairdryer. Now she took a varnish for decorative art and painted the whole picture in two layers. Each layer was pre-dried with a hairdryer. During the opening of the cup with varnish, we try not to crawl out of the edges of the drawing, but to completely stain it. The quality of the varnish will depend on how long the drawing on the cup will serve you. If the picture is well varnished, then the picture will not be washed off.

So our cup is ready. Have a nice tea party!