For work, we need:
- a bottle of champagne
- white slanting inlay 6-7 meters
- white satin ribbon 5 cm wide
- scissors
- glue
- needle
- thread
- beads and artificial pearls
- rose from ribbons
- narrow ribbon in rose color
- any plastic bottle
- rhinestones

We clear a bottle of a label. To do this, it is desirable to place it in a bucket of cold water and leave it overnight. If the champagne is of high quality, in the morning the label will be removed without any problems. If you decide to remove the label under running water, do not use warm water. So, the bottle is clean, you can proceed!
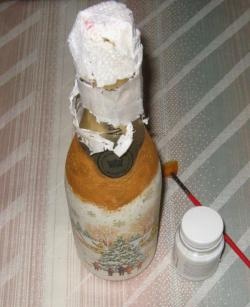
We will start by gradually glueing the bottle with pieces of white slanting inlay. Getting started with the neck. We measure out a segment sufficient to grip the neck, glue to the bottle. I use glue Moment, you can use a silicone gun, if it is more convenient for you.

Repeat this procedure. We measure, cut and glue.

The bottom layer should go slightly to the top layer. At this stage, the glue is visible, but when it is completely dry, it will not be visible.
The bottom of the bottle will be hidden under the skirt, i.e. he will not be visible. But anyway, I decided to cover it with a wide white tape so that the green bottom of the bottle would not break out from under the skirt.

And now it is already possible to complete work with a slanting inlay by sticking a bottle up to a white ribbon.

The photo shows that the last rows of the slanting inlay I made slightly shortened. This will not be visible in finished form. At this stage, the main thing is to make a beautiful back for our bride.

We pass to the skirt. We take a white ribbon 5 cm wide and begin to string it on a string, forming soft waves.

Having collected the required length of the tape, cut it off, connect the edges and glue it to the bottle. This will be the bottom layer of our skirt.

We do the same for the second layer. Glue the second layer a few centimeters above the first.

In the same way, glue the third and last layer of the skirt. It seems to me that this will be enough. You can add as many layers as you want. In order to hide the not very beautiful top of the ribbon gathered on the thread, we glue one layer of oblique inlay on top of the seam, so the product will look neater.

On top of the oblique trim we glue a contrasting narrow tape.

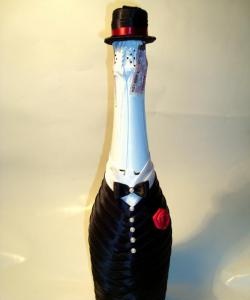
On the front side, we will make a loop of ribbon of the same contrasting color and glue it to our dress, as shown in the photo.

To give a more finished look, glue a white rose. Here is a dress decoration we did.

Continue decor. To simulate buttons, I glue rhinestones on the joint of the layers of oblique inlay.

Well, that's all, they dressed the bride, now she needs to be dressed up with decorations. To do this, we will make her beads. I stringed artificial pearls on a string and alternated it with silver beads.

Tied right on the bottle, neatly cut the ends of the thread. Getting to the decor of the head. On our heads we will have a hat with wide brim. First, glue the neck of the bottle with short segments of white oblique inlay. This will be the top of our hat.

To hide irregularities, glue one layer of oblique inlay on the neck, as shown in the photo.

Now we cut out the hat fields from any plastic bottle. The inner circle is equal to the diameter of the neck of the bottle + 2 or 3 mm. And the outer circle will depend on how wide the fields of the hat will be. I have a margin of about 1.5 cm.

We wrap it with an oblique collar, fix it with glue from the inside.

Now that the fields are ready, put them (in the literal sense) on the bottle.

We decorate the hat with a narrow ribbon of contrasting color.

Glue the same color of the ribbon ribbon.

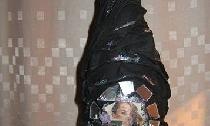
Our bride is ready!