- white beads - 85 g;
- black beads - 10 g;
- gray beads - 60 g;
- green light beads - 50 g;
- green dark beads - 45 g;
- piece of plywood;
- metal screw;
- artificial flowers for decoration;
- green beads for stand of any color, 20 g.
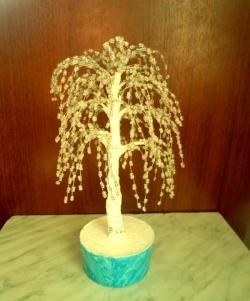
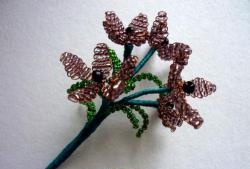
The work process begins with the manufacture of a birch trunk. On a thread with a needle, dial 35 black beads and lock them in a ring. String one bead and stretch the thread through the last bead of the 1st row and the first of the 2nd, string the next bead and continue weaving in the same order. This method is called "hand weaving in a circle." For the trunk you need to use white matte beads as the main color, and black and gray to give the birch naturalness. The trunk length will be 120 rows, each 10th row should be reduced by one bead. The thread is not cut. The barrel is filled with polyethylene using a long awl.

Further, the manufacture of thick branches follows. To do this, string three white beads on a thread and use the “manual weaving” method to start the branch, adding one more on both sides, until a row of seven beads is obtained. Close these seven beads in a ring and continue weaving in the “hand-woven in a circle” manner. Such a branch should be 35 rows long, and every 7th row should be reduced by one bead. It is necessary to complete 13 more branches: 2 branches - 35 rows, 4 branches of 18 and 30, 3 branches of 25 rows. Threads are not trimmed.

To make leaflets, you need to collect three dark green and one light green beads on a thread, and run the same thread through the first one. Get the top of the leaf. The collected second light bead is passed through the first light. This is the bottom of the leaf. In this way, execute the three upper and two lower parts of the leaflet. Give the leaves the same thread with the help of two additional beads. The thread should be tightly tied and cut. Make another 500 leaves.

After the thick branches and leaves of birch were made, it was the turn for thin branches. To do this, on the remaining thread of a thick branch, collect 35 gray beads and 1 green and attach a leaf. Thread back through one green and five gray beads. Four more gray beads are strung and one green, a leaf is attached, and the thread returns, a small twig is obtained. Such branches are made every 5 beads to make thin branches with leaves. There can be any number of such branches.

The next step is to sew thick branches to the birch trunk. To do this, you need a large needle, which must be pulled through large branches and the trunk. At the top of the birch, you can make several thin branches with leaves.


For the stand, a piece of plywood is taken, in which a hole is drilled, a screw of 10-15 cm is inserted and screwed into polyethylene, due to which the trunk can turn out to be slightly curved. Apply glue to the stand and pour green beads, then glue the weed. Also, apply glue to the points of attachment of thick branches with a trunk.
Birch is ready.