For creativity, we need materials:
- board (in this case 15 * 20 cm);
- skin;
- white acrylic paint (as a primer);
- gouache (it is better to purchase individual jars of gouache, including a gold color);
- PVA glue;
- brushes of different sizes (preferably protein or columns);
- varnish for woodwork (matte or semi-matt);
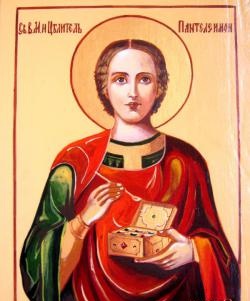
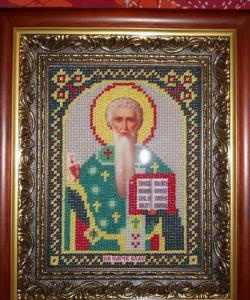
- an icon or photograph, picture or Orthodox calendar with which we will make a list of icons.
1. Before starting work, it is better to read a prayer or simply say: "Lord, bless." So things will go faster and better. Now we need to sand the board. To do this, take the skin thicker and grind the surface in circular motions. With the skin - nulling we bring the board to a smooth state.

2. Acrylic paint is applied to the surface of the board in two or three layers. If necessary, it can be diluted with water 1: 1. Next, you need to polish the board to perfect condition.

3. The third stage is very responsible. We need to draw a drawing of Jesus in pencil. Here you need to observe all proportions. If difficulties arise, use tracing paper - transfer the drawing to it, and then attach to the board and circle, it will print.

4. At the fourth stage, you need to dilute the ocher paint with water and PVA glue and paint the board in one or two layers. This is done so that the tones of the future icon are not too bright and open. The pencil drawing should shine through, so we apply the paint in transparent layers. Now draw a brown outline around the outline. To do this, take the thinnest brush.

5. At the fifth stage, you can relax a bit and remember your childhood. Now we will do about what the children in the coloring books do. Fill the icon with color. We fill each fragment with the darkest color, (we must add a little PVA glue to the paint) which is on the icon. For example, face, it has darker and lighter tones. So, we need to take the darkest tone and fill the face with color. In this case, a dark brown color. This is done in order to highlight fragments in the next step.
In the same way we do with other parts of the picture - clothes, hair, etc. Apply paint in two or three layers. At this stage, the main thing is accuracy. Remember that the colors in the icon should not be bright, so you can mute them with ocher. Paint the background with gold paint.

6. The sixth step is the most laborious and responsible. We need to give volume to the picture by highlighting fragments. Let's start with the face. We take the ocher-colored paint, mix it with white and gradually lighten the areas of the cheekbones, forehead, and nose. A smooth transition will be obtained at one time. We will highlight until the face acquires a three-dimensional shape. We also add volume to folds on clothes and other fragments. Do not forget to add glue to the paint so that the previous layers are not washed away.

8.Now you need to apply varnish to the icon. Choose a matte or semi-matt varnish for wood. So the icon will not glare. Apply varnish in two or three layers, dry. Be sure to consecrate the icon in the temple. God help you!