Do it yourself
Life hacks, master classes, useful tips, recipes.
home » Construction and repair » Repair » An easy way to grout tiles
In the process of DIY repairs, many problems arise. Some of them can and should be solved independently, including finding your own, original solutions. So, through a process of trial and error, I found a way to apply grout to the tiles. I can’t safely say that such a simple (like everything close to genius) idea never occurred to anyone else, but for me it became unique, since I had never seen it anywhere before.

how to apply grout to tiles


So, how to grout tiles on the floor without getting dirty and endlessly cleaning the floor? The answer is simple - regular wide tape!
It is important here not to be afraid that the tape will stick tightly to the tile or leave sticky marks - this will not happen. Masking tape is much less convenient - the grout dries instantly on it and when the tape is torn off, small crumbs of grout spill out onto the floor. You will have to vacuum or sweep. And since we are trying to save ourselves from unnecessary work and the question of how to clean the grout from the tiles, it is better to take simple tape.
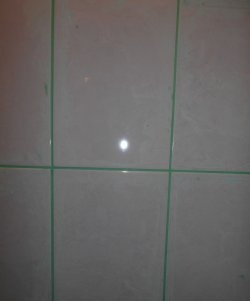
Grouting process
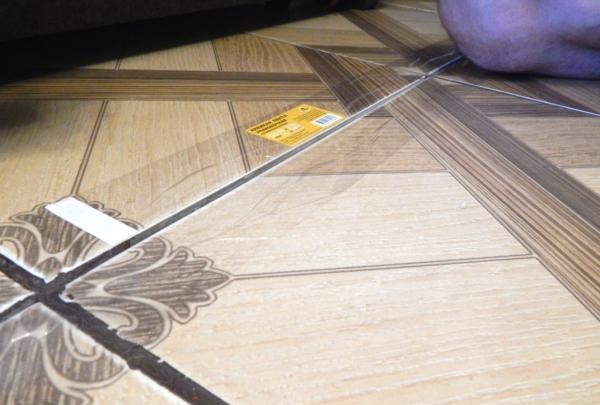
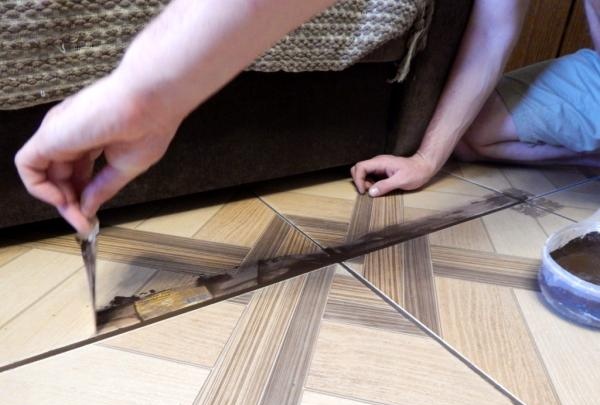
Actually, there is nothing complicated.Grouting tile joints occurs in a standard way: the same consistency of the mortar, the same tools. The only difference is that strips of wide tape are glued along the very edge of the seams.
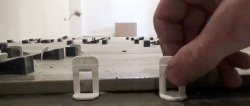
• It is most convenient to work with two or three tiles at once. Adhesive tape is glued along one line on both sides.

glue it with tape


• When the surface is ready, apply the solution to the seam with a spatula. We press the grout well inward along the entire length. Then we move the tool along the seam with a strong movement to remove excess so that the layer of grout is uniform.

apply grout to the tiles


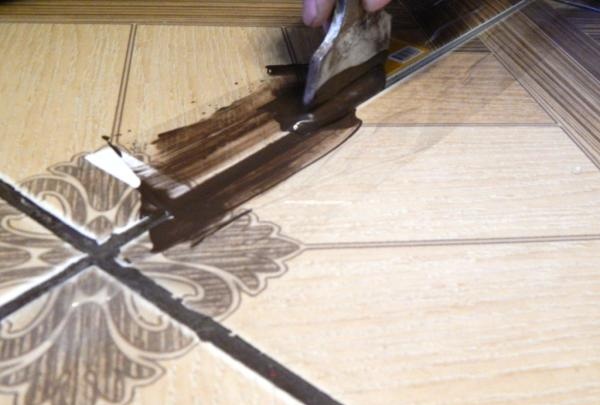
• You don't need to grout for very long so that the grout does not have time to set properly. Of course, you should try not to swing the tool too much so that dirt does not get beyond the edges of the “safety” tape.
• When everything is ready, carefully peel off both strips of tape from the edges of the seam.

peel off the tape


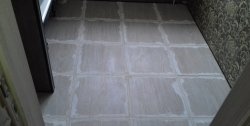
• As a result, we obtain an almost perfectly flat and clean surface. Random droplets can only be wiped off with a damp sponge once.

Conclusion
Some might say that applying adhesive tape takes a lot of time, but personally, I find it much easier to spend a minute applying tape than to wash the floor several times. Everyone decides for themselves how to grout tiles correctly, but in my case this method made life much easier. I hope this simple tip helps you too!
come back
Comment
  • bowtiesmilelaughingblushsmileyrelaxed relaxedsmirk
    heart_eyeskissing_heartkissing_closed_eyesflushedrelievedsatisfiedgrin
    winkstuck_out_tongue_winking_eyestuck_out_tongue_closed_eyesgrinningkissingstuck_out_tonguesleeping
    worriedfrowninganguishedopen_mouthgrimacingconfusedhushed
    expressionlessunamusedsweat_smilesweatdisappointed_relievedwearypassive
    disappointedconfoundedfearfulcold_sweatperseverecrysob
    joyastonishedscreamtired_faceangryragetriumph
    sleepyyummasksunglassesdizzy_faceimpsmiling_imp
    neutral_faceno_mouthinnocent
5+two=
Comments (4)
  1. Grisha
    #1 Grisha Guests 20 October 2014 22:53
    2
    I will say that for the smooth tiles you have, it’s very strange to steam with such nonsense as adhesive tape.)
    I grouted 200 sq/m tiles, size 60x60cm, in 3 hours... with wiping, etc. with your system it would take me 1 day)
    1. Akril
      #2 Akril Guests 9 April 2019 22:15
      1
      And another week to remove traces of tape from 200 square meters. tiles..you wouldn’t spit on these tips, Grisha)))
  2. Sim
    #3 Sim Guests 23 January 2015 21:19
    3
    traces of adhesive tape are sometimes even more difficult to wash off than fugu (grout smile )
  3. Akril
    #4 Akril Guests 9 April 2019 22:14
    1
    I would kill the builder who plans to stick tape on the tiles... you can’t imagine how difficult it will be to clean it, and there’s no need to reinvent the wheel here, everything is simple and ingenious, a spatula, a sponge and a bucket of water, which needs to be changed more often - that’s all !!!

Useful ideas for home and workshop

13 DIY carpentry hacks and tips from the pros

Dimmer repair | Do it yourself

Heart from Quilling | Do it yourself

«Do it yourself - with your own hands» - a site of interesting homemade products made from scrap materials and items at home. Step-by-step master classes with photos and descriptions, technologies, life hacks - everything a real master or just a craftsman needs for needlework. Crafts of any complexity, a large selection of directions and ideas for creativity.

We recommend reading

Washing machine error codes