In the article I want to talk about how you can make this type of jewelry yourself. It will take a little time to make such a bracelet. Special skills are not needed. Even a beginner needlewoman can make a bracelet.

For making jewelry you will need (the calculation of the amount is given below):
1. beads (large and small)
2. satin cord
3. threads
4. needle
5. hooks (2 pieces).

Directions for work
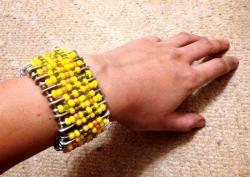
At the very beginning, you need to measure the girth of the wrist. The master class uses the number of beads needed to make a bracelet 18 centimeters long (wrist girth 15 centimeters).
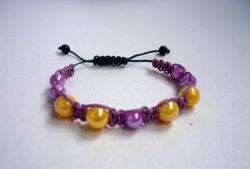
You will need 2 types of beads: about 20 pieces large (diameter about 8 millimeters) and 70 small (diameter 3 mm). The difference in the size of the beads should not be very large, otherwise the product will turn out ugly. The cord for the bracelet can be of any kind, the main thing is that it is not thick (I bought a satin cord 2 mm wide). Its approximate length is 1 meter. The cord should be 4 times longer than the girth of the wrist, you also need to leave a margin for fastening the fastener.
Before work, be sure to check whether the needle passes easily into the bead. It is necessary to make sure that when repeating the action (when you have to push the needle and thread a second time) there are no problems. The thread should be long and the color of the cord. When reconciling the threads of a contrasting shade, the work looks sloppy. You can use different types of fasteners. I like ordinary hooks and buttons.
The process of making a bracelet
First you need to take the cord and cut it in half. Attach a hook to the first part, and put the second one aside. Then insert the needle from the back into the left side of the cord. So the knot at the end of the thread will not be visible.

Put a bead on the needle. Then the needle with the thread must be carried over the right side of the cord. Then the action must be repeated, but the thread should already pass under it. Then insert the needle into the same bead.

The thread with the needle must be carried over the left side of the cord, then under it. The next step is to pick up a new bead.

Repeat the steps until the bracelet is long enough.

After the length of the bracelet has reached the desired value, you need to cut off the remaining cord. What remains is to fasten on the hook. To do this, let the rest of the cord into the loop of the hook. Then we fix all this with glue “Moment” or with a needle and thread. It turns out a bracelet. You can leave it this way, but it’s best to continue the work: weave another narrow bracelet from the part of the cord laid aside, and then connect the bracelets together, passing a series of large beads between them.

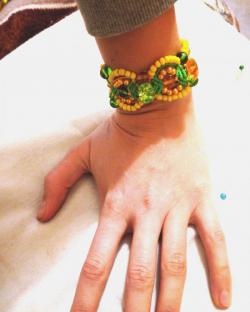
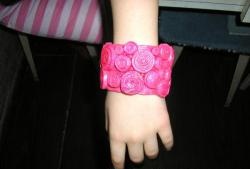
The resulting bracelets may differ from each other. They can be made in various colors, use different clasps and beads.

So, we make the second exactly the same bracelet. We’ll make the second product a little longer. This is necessary so that the bracelet fits well on the hand.

Then we will use these 2 bracelets as cords to weave larger beads between them.

We repeat these steps until the completion of weaving.