Before starting work, we recall that it is necessary to work with gypsum-cement mortar and alkyd paints in rubber gloves in a well-ventilated room or on the street. It is desirable to cover the working surface with paper or polyethylene. Take a plastic container and fill it with sand and wrap it with wire. This is done so that during operation the container does not deform under the weight of the solution. If a container made of hard plastic, wood or metal is used, this item can be omitted.

Prepare a solution. For this we take in equal parts cement and sifted sand. Mix them in a separate container. After stirring the mixture, add pure water in parts. After thorough mixing, a thick homogeneous solution should be obtained. In a separate small container, set aside a silent cement mortar and add building gypsum to it. Since the alabaster quickly hardens, immediately apply the solution to a moistened flower pot. After the solution has hardened, wrap the workpiece with a building mesh and apply a second layer of asbestos cement. With a wet palm, iron the workpiece, thereby leveling the surface.

At the next stage, we will form decorative elements. To do this, we will use the same solution with the addition of more building gypsum. Eyebrows. Take a small amount of gypsum cement and with wet hands form a sausage. We divide it into two parts and attach it to the moistened workpiece.

When applying embossed elements, it is not necessary to use adhesives - just moisten the main surface and the glued part. Eyes. Take a little mass, divide it into two parts and roll up the balls. Attach them to the desired shape.

We make eyelids out of sausages and draw with a stack or a knife.

In order to hide the joints between the parts, smooth them with a wet hand. If the solution had dried by then, then you can take a little cement, dilute it with water and apply it to the joints with a brush or fill in the cracks. Nose. This part must be done in increments. First, the base of the nose (the widest part) is formed, after which the remaining elements are built up - the tip of the nose and nostrils. We’ll make a stump of two sausages. To form the bark, we’ll put some asbestos cement in the palm of our hand (the solution should be thick, not spreading over the surface) and put it on the pots in the direction from top to bottom. We will make frequent indentations with our fingers.

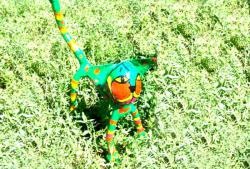
On the side we make mushrooms. To do this, we form sausages and attach them to the pots. These will be the legs of the mushrooms. We will make hats from balls flattened between the palms.

Leave the pots until the solution solidifies. Before painting with a brush with a hard bristle or a brush, we remove dust and particles of the solution from the workpiece. After we ground the surface. To do this, you can use acrylic primer or alkyd enamel diluted in white spirit. We cover the pots with a thin layer of ivory alkyd enamel.

To do this, add a little yellow to the white paint and mix well. After the paint has dried, apply a little orange paint to the dry sponge and cover the surface with blotting movements.

After, also using a sponge, paint the pots with brown paint. With a thin brush, draw the eyes, shade the nose, eyebrows and mouth.

Beige paint will cover the legs of mushrooms, red - their hats. Then apply white dots to the hats and draw green grass.

At the end with a sponge we apply yellow paint. If not alkyd, but acrylic paint is used, then it is recommended to cover the cache-pot with several layers of varnish. Before planting plants in the pots, make holes in the bottom of the plastic container, then place drainage (pebbles or gravel), sand, and then the soil mixture. The garden planter in the form of a fabulous stump is ready.

Posted by Elena Tregub