- plywood;
- wood stain;
- gloves;
- varnish for yachts and brush;
- newspapers;
- scissors;
- nails (it is better to choose carpentry or furniture nails, we used - “Blister copper nail blister”);
- hammer;
- threads.
Stages of Robots
1. First of all, you need to prepare the plywood of the required size. If your plywood is too large, you can reduce it to the required size with a saw. The thickness of the plywood must be at least 4-5 mm, otherwise it may be difficult to drive in nails.

2. To give the tree a beautiful color, use a stain. A wood stain can be purchased at a hardware store or made yourself, as we did. The recipe for cooking it at home. You will need 1 cup of vinegar, 1/3 cup of ground coffee or tea (we used black tea) and a steel washcloth. Place all the ingredients in a jar, close the lid and put for 2-3 days in a cool dark place (for example, under a cupboard or bed).

This stain has a very specific smell, so it’s worth working outdoors. Wear tight gloves and use a steel washcloth to apply the stain in a circular motion.

Do not be afraid that the stain seems transparent and does not paint the tree at all. Apply it in several layers and leave to dry overnight in the open air or in a very well ventilated place. If you decide not to experiment and purchased a stain in the store, then apply it to the tree in several layers and leave it to dry completely.

3. When the surface of the painting is dry, go to the varnish. It is better to put a varnish in 2 layers. Varnish will protect your creation from dust and burnout.


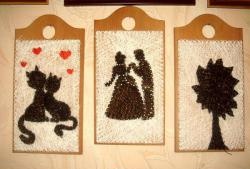
4. Use the newspaper to make a template for the future picture. This will greatly simplify the work and make it clear what the picture will look like at the final stage.

On the newspaper, mark the places where the nails will be driven in to find out the required number of nails.
5. Drive nails slightly above the newspaper line or into the edge of the newspaper at the same distance from each other. Nails should be driven in quite a bit. They should be firmly and firmly held on the board, but not stick out of the back wall.

6. Keeping the distance between the studs, drive them around the entire perimeter of the template.

7. Carefully remove the newspaper template. If small pieces of newspapers remain near the cloves, they can be carefully removed with tweezers or a large needle.

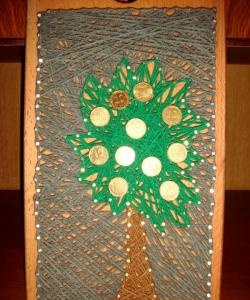
8. Tie the edge of the thread tightly to one of the studs.

Next, tie the thread on the carnations diagonally.

Continue tying cloves. Sharp corners should form between the threads.

9. Continue the pattern until almost all the cloves are tied. Tie the thread firmly and cut the remaining tail.

Then you can add threads of some contrasting color and give the picture a brightness. Tie a new thread to a loose clove and continue along the same lines. A new thread can be pulled not only over the first color, but also under the first threads and between them. So you get the volume of the picture.


Good luck and creative inspiration!