Necessary materials and tools:
- a box, which in the future will become the base frame of the box;
- fabric cuts: for finishing external and internal walls; to create the internal departments of the casket;
- PVA glue;
- scissors;
- a pencil;
- materials for decoration: lace, guipure, applique from denim and felt, rhinestones.
Stages of work:
1. Prepare all the necessary materials. If you have the opportunity to use a box with a small lock or latch, then your box will look more impressive and will be convenient to use.
2. The inner wall of the box must be glued with PVA glue with a cloth. This type of glue is convenient to use, as it leaves no residue on the fabric. Super-glue can leave marks on the fabric, and it will not look aesthetically pleasing and not neat.

3. To create compartments for jewelry, you need to use a dense and fairly thick fabric. The fabric needs to be cut according to a certain principle: the width of the fabric corresponds to the width of the box, and the length is more than the width of 20 or more times (depending on what fabric you use and how many compartments you need).

4. An accordion must be folded from the finished fabric cut. If the number of compartments suits you, feel free to insert the accordion into the box. If you want a smaller number of compartments, fold the fabric in half and create an accordion.

5. Tape the outer cover with a cloth using PVA glue.

6. On the bottom wall of the box, stick small pieces of fabric for easy operation. You can use the fabric that was used to create the internal compartments.


7. Also glue the sides of the box with a cloth.
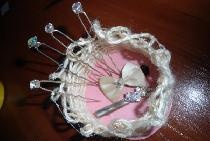
8. Let's start decorating. We decorate the top cover with guipure, gluing it with the same PVA glue. Glue needs to process the edges and the entire surface of the top cover. Glue the side wall with thin lace.

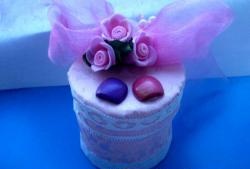
9. The top cover is decorated with an application of three hearts. For application, you can use felt, denim or other beautiful fabric. Felt is very convenient in creating decor, it does not crumble and is easily cut out. Application can be made of any form and theme. You can also use jewelry items (bows, figures, beads).

The box is ready to use! This box is an excellent organizer for rings and earrings, cloves, pendants and clips.

Use your imagination and create!