What do we take for this creation:
• Red satin ribbon 5 cm wide, two meters;
• Black satin ribbon 5 cm wide, about 0.5 meters;
• Lighter;
• Sharp scissors;
• Ruler;
• Pencil;
• tweezers;
• glue gun;
• Thick cardboard for the base, small cut.


So, let's get started. We take the red satin ribbon and measure from it equal squares measuring 5 by 5 cm. We should get 38-40 of them. Cut, now we take a lighter and process the edges on each square so that the tape does not unfold.


We get the finished red blanks for the petals.


Now we take the black satin ribbon and cut from it also squares 5 by 5 cm, about 12-13 pieces.


We also take a lighter and process the edges. We get black blanks for the petals.


We take one red square, fold it diagonally.


Then fold diagonally a second time. And also the third time.


Now we take tweezers, we insert a petal into it, we clamp. With sharp scissors we cut obliquely the petal, as in the photo below.


Lighter carefully process the petal slices.
Expand carefully and straighten, we get such a red petal.


In the same way as red, we make a black petal. Add diagonally once.


Then the second and third, also insert into the tweezers and cut off the edges. In black petals, slices can be made a little more, respectively, and the petals will be slightly smaller than red ones.


We burn the slices with a lighter, straighten the petal.


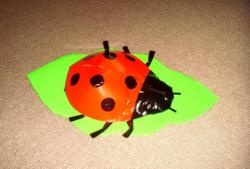
So do all the petals of red and black squares. From the red mother-of-pearl cardboard we cut an oval. Cut one side up, it will be the head of a cow.


We make the head of a ladybug. I made from cotton pads in several layers, and then tightened and trimmed with a black ribbon. You can also use a button or a finished half bead. Glue the head with a glue gun. Now we take the petals and glue some in pairs with each other, you can even glue three petals together. Now evenly spread the petals and glue the gun to the cardboard base.


In each row, gradually add one petal. In the process, it becomes clear how many petals you need to add. In the center, lay out the black petals. So completely glue all the petals and form a ladybug. It remains only to glue either a hairpin-clip, or a hoop and a ladybug is ready. If desired, you can add a few green petals in the form of a substrate, if we allow the color of the outfit. Thank you all and good luck!