Manufacturing technology:
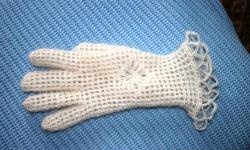
These openwork gloves without fingers, or mitts, are back in fashion! Experienced needlewomen can knit this elegant accessory in one evening, beginners can do two, since the complexity of the product is low. Our model is crocheted No. 2 from acrylic (size 19). We begin to knit a product with two openwork motifs-squares, combining which, we get the cuff of our mitten. We knit squares like that.
We close four in. p. (air loops) in a circle.
1st row: eight tbsp. b. n (single crochet) into the girth of the base ring.
2nd row: tie the starting three vp, * another three vp, then one art. with n (double crochet), three VP, repeat from * another 6 times, three VP, close half-column with the last of the three starting loops.
3rd row: again the initial three vp, * in the lower arch of the arch we knit three tbsp. s.n., three vp, one art. b. n, from * we repeat the same thing three times, three vp, close a half-column with the last of the starting loops.
4th row: initial three vp, * three vp, one art. b. n on the central of three tbsp. from. n row-base, then 3 c.p., 3 tbsp. with n into the lower arch, one VP, then we make a picot of three VP, and one VP is knitted, then three Art. with n into the lower arc aerial arch, repeat from * three times with the difference that in the third repetition instead of the final art. with n three vp are considered beginning of a row. Connect everything in a half-column.
fifth row: Moving in a circle, alternate three vp and Art. b. N., performing it on each lower arc of the previous row of arches and on each center of the "shell" of Art. with n row-basics.
Repeat again to get two squares.

Next, we stretch the squares on a solid base and crochet in the places of the side seams, for this we knit two vp, and then, alternating the upper and lower fragments, on each arc lower arch we perform art. b.n., and again two v.p. and move on to another square, etc.

When everything is ready, it looks like a net.

And now the side seams are ready. We turn to the expanding part of the mitts.
1st row: starting three VP, * one VP, two Art. with n on the arch arch, one tbsp. with n at art. b.n. basics, two tbsp. with n on the arch arch, one vp, repeat the indicated sequence according to the drawing for each square fragment, in the places of the side joints two art. with n., fix everything with a half-column.
2nd row: three in. n. at the beginning, one art. with n in one vp row-basis, * further two vp, one art. b. n in the second article. with n out of five, three vp, one bp in the fourth in a row with n of five, two vp, at the next five tbsp. with n of the previous row we also knit all five of Art. with n., repeat from * according to the drawing for each square fragment, in the places of the side joints one art. with n., fix everything with a half-column.
3rd row: again the initial 3 c. p, * one c.p., five tbsp. with n "Fan" in the arch of the base, one VP, five tbsp. with n in a row at the next five articles with n row-base, repeat from * according to the figure for each square fragment, in the places of the side joints one art. with n., fix everything with a half-column.
4th row: starting three vp, two vp, * carry out a “slingshot” of two tbsp. with n., divided by one VP, at the central of five art. with n grounds, one VP, one VP grounds dividing the five art. with n basics, one art. with N., then one VP From * we repeat according to the drawing for each square fragment, in the places of the side joints one art. with n., fix everything with a half-column.
5th row: starting three vp, two vp, * we perform a “slingshot” of two tbsp. from n., divided by one VP, in the center of each slingshot of the base and at each single art. with nbases connected slingshot shared by one. n. In this row, “slingshots” are also knitted in the places of the lateral joints.

The next, 6th row, fits in the same way, with the difference that we leave the three slingshots untied - in order to start the thumb here in the future.

We proceed to the implementation of the 7th row, we knit it similarly to the 6th. We also knit a chain of the required number of loops (in our case, 9 vp) in an untied place of the base, so that it fits into the gap between the index finger and thumb, and fix it with a half-column.
In the 8th row, we repeat according to the figure of three tbsp. with n in the center of each slingshot, dividing them with one VP, do the same twice on the knitted loops of the thumb.

In the 9th row on each triple of Art. with n a pair of merged art. with n., divided by two vp and thus the future arm is shaped like a hand.

In the 10th row, we continue the narrowing of the part, performing the triple fused st. with n with a single peak, the central of which is located at the junction of the previous two stations. with n grounds.

In the subsequent 11th row, a strapping of three VP, one art. b.n. in the lower arc arches and the central part of the triple fused st. with n

In the 12th row, a strapping of two VP, one Art. BN, each art. without crochets fits into the arch arches knitted in the previous row.
For a hand with long fingers, the strapping can be repeated further. Tying the thumb - all art. with n
The right mitten is ready.

In a similar way, we knit the left one, counting the mirror thumb.