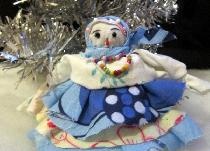
First a cone is made. We made it large enough to have enough space for decorative elements. The base of the cone is about a third of a circle with a radius of 14 cm (it just fits on an A4 sheet). Hands are cut out of the same paper.

White paper is needed for the face, so we make the head separately. The shape of the cylinder is more suitable for it than a cone, and then we will close the top with a cap. The height of this cylinder was about 3 cm. We painted our faces with felt-tip pens, because the pencil drawing next to the saturated color of the paper looks too pale. To make the face rosy, we used red watercolor.

The first decorative element is fur, which will adorn the hem, sleeves and hat. To make it, you need to cut off a strip of white paper of about 29.5 by 3.5 cm, fold it in half along the long side and make cuts from the fold side with an interval of 0.5 cm, leaving the edge 1 cm wide intact. Next, the strip is straightened, the uncut edges are glued together overlapping, it turns out a tube.

The hem is decorated with snowflakes made using the simplest elements of the quilling technique. First, a tight spiral is made from a narrow strip of paper (you can buy it or cut it yourself). Paper can be wound, for example, on a knitting needle, and then carefully removed from it. Then you need to weaken the pressure on the edges, the spiral unwinds a little, turning into a free spiral. The edge is fixed with glue. When the glue dries, you will need to give the shape of a rhombus with your fingers. Finally, the rhombuses stick together, it turns out a snowflake. All described elements are shown in the figure in order from left to right.

The edge of the sleeve is decorated with fur on both sides to make the sleeve look more voluminous. And another decoration is based on the quilling technique. A strip of paper is twisted from two sides into identical free spirals, which are fixed with glue, and the remaining unused paper is folded across at an equal distance from them. At the point of contact, the spirals are also fixed with glue. The finished design is glued to the sleeve.

The basis for the cap is a tight spiral. To save time and paper, we wound it on a felt-tip pen, and then decorated the remaining hole with a pompom made just like fur. To give the spiral the shape of the cap, you need to lightly shift the layers. Having achieved the desired result, we secured the position of the turns by gluing a strip of paper from the inside. The bottom of the cap is bordered with fur.

Now that almost everything is ready, you can stick the head, hands and jewelry for the hem. The bottom of the hem is decorated with fur; a collar and a vertical edge are also made of fur. Using the latter, you can hide the bonding place of the cone. Snowflakes are located symmetrically in the lower part of the hem. The last detail is the hair. The strands are spirals for 1-2 turns with long ends.These loose ends stick to the top of the head. To make the hairstyle of the Snow Maiden look beautiful, it is better if the length of the strands will gradually increase from the temples to the back of the head. It remains to stick a hat, and the Snow Maiden is ready.