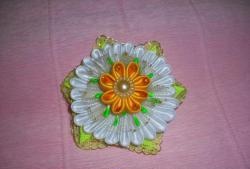
Materials and tools.
1. Wire (0.8 mm, for welding)
2. Tape narrow (width 0.5 - 0.8 cm)
3. Double-sided tape (width 0.8 - 1 cm.)
4. Nippers, pliers
5. Scissors (very sharp)
6. Ruler
7. A small piece of padding polyester or cotton wool.
8. Balls 5 inches pastel (preferably made in Mexico, they are the softest, but strong) - 8 pieces
9. Ball yellow 2 inches (or 5) - 1 piece
10. Balls 9 inches green - 2 pieces
11. Ball for modeling 260 Q - 1 piece

Stages of manufacturing.
1. We take a wire and cut 9 pieces of 30 cm long.

2. At 8 pieces of wire, using pliers, bend the ends on both sides and carefully clamp. The bend should be small no more than 3-4 mm.


3. On the 9th workpiece from one end, using pliers, twist the spiral, and on the other hand we make a bend similar to the previous frames. And put it aside for now. This will be the core of our daisy.

4. From 8 main wire cuts we make loops. We fold the billet in half, trying not to make an acute angle at the bend, connect the ends together, spread them evenly in relation to each other and fix with several skeins of adhesive tape. An important point: the tape is not wound directly, but at an angle of 45 degrees from top to bottom. This makes the place of twisting more durable and prevents slipping and unwinding.

5. Frames are ready. Next in line are balls. For all balls, we cut off the pucks at a distance of 1 cm from the edge, and for the ball for modeling (SDM) only the puck.

6. Gently squeezing the frame on the sides, put on a white ball. Pull it to the end and throw it on the fixed loops. Once again tightly tighten with several skeins of adhesive tape. Similarly, we make the remaining 7 petals.


7. We wind the synthetic winterizer onto the core core spiral, forming the center of the flower. The more you want to get it, the more you need to wind the filler.

8. Stretching the neck of the yellow ball, we put it on the resulting workpiece. We fix the ball on the stem with tape. If it turns out a little uneven, use your fingers to distribute the synthetic winterizer inside the ball until you get a result that suits you.


9. We begin to assemble the flower. Laying the petals on top of each other, lay them around the core. Trim the height of the petals to the top. Check the uniformity of the calculation, and tightening it tightly, fix it with tape. Scroll firmly with duct tape to the end of the petals.


10. One by one, carefully open all the petals of the resulting flower.


11. We take a ball for modeling (SDM) and cut it along, leaving 1 cm not cut near the tip.

12. At one green ball, cut off the top and cut out the sepals.


13. Put 1 turn of double-sided tape on the border of the bend of the petals, and put on the resulting sepals.We fix it with tape.


14. On the second green ball, make cuts from above and from the sides, then finely cut into strips, forming chamomile leaves. Using double-sided and regular tape, we fix to the transition point from the petals to the stem.


Getting to the design of the stem. To do this, we need a modeling ball, already prepared by us. We string it on the stem and wind it with a spiral to the petal. It is imperative to pull the ball and lay it evenly so that there are no gaps. Having reached the petal, first scroll a little higher than it, then, continuing to wind up, go back a bit (under the petal), and after that move to the very top. This will allow you to fix it (cross-wise) correctly.


15. If you have an extra ball left, do not reel it until it runs out. Just cut off the rest. Using a small piece of double-sided tape, glue the end of the SDM and fix it additionally, putting on the stem in this place a patch from the ball itself.


16. Our flower is ready!

Similar flowers live for six months or more. They do not like dust, moisture and direct sunlight. Good luck!