article on the use of an old compressor from a refrigerator, for use in an airbrush.
So chapter one: production.
Usually in our latitudes the habitat of wild or feral compressors is rather small, although there are exceptions. Most often, they can be found near trash in the courtyards of houses or in cellars, where all rubbish is stored. Usually they are tightly screwed to a large white box, which in common people call a refrigerator and store beer in it. Hunting for a wild compressor with your bare hands will not work, it will not be given to you just like that. In the meantime, you will run after weapons, a wild compressor may well become home, but already a stranger.
You must have a special set of weapons with you - pliers, flat-head screwdrivers and a cross, 2 keys for 12X14. If a large white box is found, it is necessary to carefully examine it, usually the compressor is hidden in its lower part at the back. If the compressor is detected and you have the necessary set of weapons, you can start production.
Compressor mining is a simple process, but you need to approach it carefully and carefully, otherwise there may be problems in the future. The first thing to do is to bite off the copper tubes with pliers or side cutters that go to the cooling grill, with an allowance of at least 10 cm, and preferably at the maximum, then the extra tubes will come in handy (on some types of compressors, a metal plate with embossed numbers is fixed on the tubes - do not throw it away, it can come in handy too). Moreover, the tube must be bitten off! In no case can you cut, the chips will surely get inside, then your compressor can get very sick and die. When biting off, the tubes flatten, you can not be afraid of this, and it will help not to splash oil during transportation.
At this stage, I can recommend to pour a drop of oil from the compressor onto a piece of clean paper and look at it for metal particles. If the specks of silver dust are noticed in the oil, you can no longer continue, and respect for a minute of silence the fond memory of the dead unit.
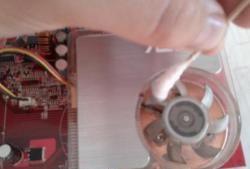
The second and most important thing - the compressor does not only consist of hardware, it also has another and very important organ - the start relay. The relay looks like a small black (sometimes white) box, screwed separately with screws next to the compressor, wiring goes into and out of it. It is necessary to carefully unscrew the relay from the refrigerator, and in the same way, carefully disconnect the connector that goes from the relay to the compressor carcass (this applies to old pots, for other types of compressors the relay may be non-removable). The incoming 2 wires will most likely have to be bitten off, they still do not go straight to the plug. There is another important point - you need to remember or mark in which position the relay was screwed, where the top and bottom, it happens and is signed, but not always. Why is important - more on that below.
And finally, the third - using 2 keys to 12, we turn off the compressor carcass from the refrigerator. It is usually bolted with 4 bolts and nuts through rubber gaskets. It is advisable to take this entire set of fasteners and rubber bands with you, it can come in handy during subsequent preparation for work.
Chapter Two: Preparation (Domestication).
So, you just got your compressor, smeared with dirt and oil, with your hands scratched and stretched to your knees, tired but happy, finally reached his house. Now you can begin to prepare the compressor for operation.The first thing to do is a test run. We dress the relay connector to the contacts in the compressor housing. We orient and temporarily fix the relay on a horizontal surface, you can even stick it with tape. The main thing is to fix the relay as it was in the refrigerator, it works on a trailer of gravity and plate heating. If you orient it incorrectly, or simply throw it on the weight, it will not work correctly, and this can end fatally for both the relay and the compressor motor windings.
Carefully and with the help of electrical tape we fasten the temporary wire with a plug to the wires entering the relay. I strongly recommend that you wind up the place of twisting with electrical tape, your safety and life depend on this. Modelers and so few, let's cherish them and yourself. Flattened tubes need to be squeezed with pliers, they will diverge to the sides and release the air passage.

When everything is ready and fixed - you can stick the plug into the outlet. Usually this is accompanied by a small sparking and popping, the load is still considerable. If everything is in order, the compressor should turn on and rattle quietly. Air should go out of the tube, you need to mark which of them is “inspiration” and who is “exhale”. You don’t need to drive for a long time, the main thing is to make sure that the assembly is working. If it is not OK and the compressor does not start, or starts and turns off after a while, it’s not a good thing. For a small examination, you need to be friends with electrical engineering and a tester. If you are not friends with these things - I do not recommend poking around further.
Well, if you are friends or have an idea - continue. It is necessary to remove the relay connector from the compressor and ring the motor windings. They should call with little resistance to each other in any combination. If one of the windings does not ring, we hold in our hands the body of the deceased unit. If you make a call, then you need to inspect and clean the relay. Carefully open the box and clean the contacts with fine sandpaper. The main thing is not to bend or break them off; you also don’t need to rub much.
Then we collect everything back, fix it as it should and try to turn it on again. If it doesn’t start again or turns off - alas, no luck ... (This is provided that the relay is native and came with this compressor. An emergency shutdown can occur due to the fact that the motor is more powerful than the one for which the relay is designed, then you have to look for another relay, and the plate on the handset will help.) However, let's not talk about sad things, we hope that everything worked.
Now you have to assemble your unit in a more adapted and compact device. Of course, I do not pretend to be true, everyone has their own capabilities and means to achieve this goal, but I will outline my approach to assembling the entire device. To do this, you need to visit the nearest auto parts store, car market or a stall with spare parts. There you need to purchase:
A liter of engine oil for replacement, 10w40 or another mineral or semi-synthetic. usually a liter is the smallest container, but if you are lucky, it can be draft, and 500 grams is enough. At worst, you can grease all the creaky hinges in the house.
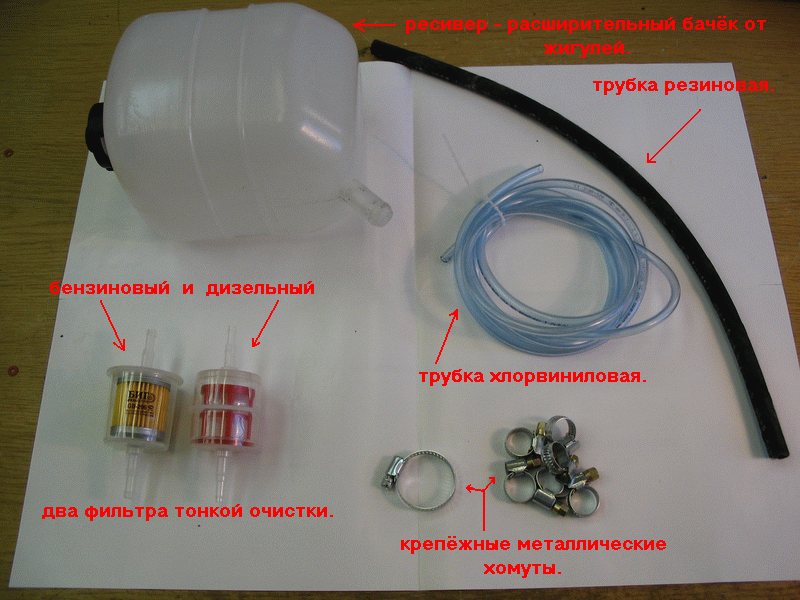
Reinforced rubber oil and petrol resistant tube, about a meter long and 4 mm inner diameter. It’s good to have a piece of copper tube from the compressor with you, you can try on the right rubber tube to it.
Metal coupling clamps, 6 pieces. They must be tried on a freshly bought rubber tube. They should be a little larger in diameter.
PVC vinyl washer tube. They are translucent, there are also reinforced ones, but we don’t need such ones. The length must be selected depending on the location of the compressor and the comfort of operation, but not less than 2 meters.
2 fine filters - one for gasoline and one for diesel. Visually different - for gasoline there is a paper accordion inside, for diesel - inside a synthetic mesh.
A tube of oil and petrol resistant silicone sealant, better than a thick consistency and gray, more liquid and black worse.
After acquiring all this, you need to send your stops to the nearest hardware store.In it you must purchase:
Cord with a plug at the end, for feeding the compressor to the network. At least 1.5 meters long, preferably in double insulation.
Single-key light switch in a closed housing for external installation.
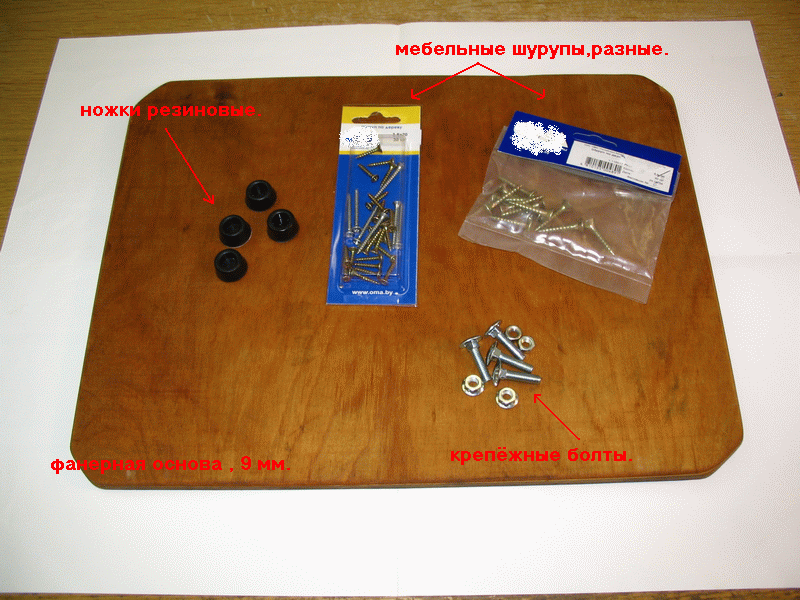
Wood screws for wood 3.5 x 16 or 3x16.
Now all this heap needs to be combined together, and we will get the coveted unit.
The first and most important point of preparation, on which the further work and durability of the compressor depends, is oil change. Many copies were broken on this occasion, it is necessary to change, it is not necessary which oil to pour and which not.
There may be many opinions, but the right one is mine! So that there would then be no empty questions such as "but it works fine for me on a sunflower!", I will write my point of view at this point.
Pure “spindle” (freon, compressor - as they were not called) oil is poured inside the compressor at the factory. In fact, it is mineral. It does not contain any additives because the compressor in the refrigerator works in a closed and airless (oxygen-free) space, and it’s not exposed to any environmental influences. When we start using it for our purposes, the situation changes dramatically. Air oxygen, dust particles, moisture, etc. begin to act on the oil. Mineral oil is pretty fast o becomes clogged and oxidized, loses its properties. This leads to strong compressor heating during operation, noise, wear of the piston system and, eventually, to jam. And this despite the fact that there was enough oil. Moreover, due to the small binders and with the wetting properties of the mineral oil, it will fly out intensively, blocking the air with vapor and reducing the operating level in the compressor.
Automotive (motor) oil is deprived of most of these problems, primarily due to the content of additives in it compensating or completely eliminating the bad factors affecting the quality and durability of the oil. Moreover, it is designed for much more stringent operating conditions than those that will be in your compressor. For example, I use motor semi-synthetics 10w40, because it remains after changing the oil in my car. You can use mineral and semi-synthetic oil with other indices, but I do not recommend using synthetic oils. Firstly, significantly more expensive, and secondly, they are more fluid and less durable.
I hope that I have written convincingly, although of course there will be unbelievers who will persistently fill any oil that comes to hand, and, yes, the flag for them.
Let's get back to our iron friend. This raises some technical point, namely - what type of compressor fell into your hands. Visually, they are divided into 2 main types - a cylinder and a pot (resembles a night vase covered with a convex lid). The first - almost extinct species, was used in very old types of refrigerators, ceased to be produced in the late 70s. But if you managed to get this type of compressor alive - you were really lucky. They can give pressure at the exit much more than the others. More often than not, the second type of compressor — pots — falls into the hands.
The main difference for us at this stage is where to change the oil. In the cylinders, most often a huge bolt is screwed on the side of the case; it closes the filler neck. It is necessary to unscrew it with a wrench, drain the old oil from the compressor into some disposable dishes. It is advisable to measure how much this oil was. Depending on the type of cylinder, they need to be filled with 300 to 500 grams of oil. Then, carefully tighten the bolt back, preferably with an oil-and-petroleum-resistant sealant.
With a pot is a little more complicated. 3 tubes usually stick out of it - inhale, exhale and a sealed filler tube. It is advisable to change the oil through it. To do this, we need to open this tube, we can slightly cut the file with a circle in a circle below the flattened place, but in no case do not cut through. Then, along the notch, the tube must be broken and completely broken off, swaying to the sides.The burr formed around the edge should be slightly nailed with a hammer. Then simply drain the oil from the pot, tilting it towards the tubes, in any disposable container. Remember - do not turn on the compressor after draining the oil!

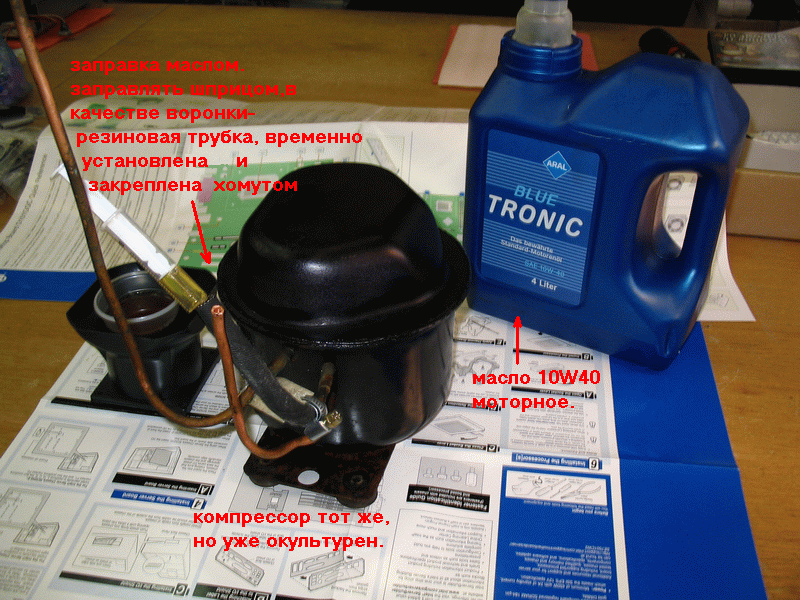
The compressor will have to be filled with a syringe, gradually pouring oil into the filler tube, you can put on a rubber tube in the form of an impromptu funnel. Oil in a pot requires about 250-350 grams. After refueling, the tube must be drowned out, otherwise the air will go through it (or vice versa - go past the filter, depending on the type of compressor). You can of course flatten it, but it’s not convenient, then you have to change the oil. I recommend screwing in a small self-tapping screw of a suitable diameter, under the cap of which there will be a rubber washer-gasket.
As in the case of oil, there are desperate or lazy comrades who will try to feed the compressor oil on the go, pouring it to the suction tube - I highly recommend not doing this. Firstly, it is advisable to change the oil all at once, and to turn on the compressor with the drained oil is to kill it. Secondly - there is such a phenomenon in piston devices - water hammer. This is when a liquid gets into the space above the piston, in a volume larger than the volume of the compression chamber allows. Liquids, as we know, are almost not compressed, and the compressor motor will try to do this. As a result, we can get the destruction of the piston system. I hope that I have convinced of this.
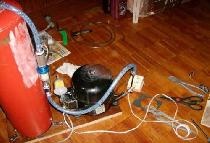
And so we continue. Now we will put everything in a heap, according to the above scheme.
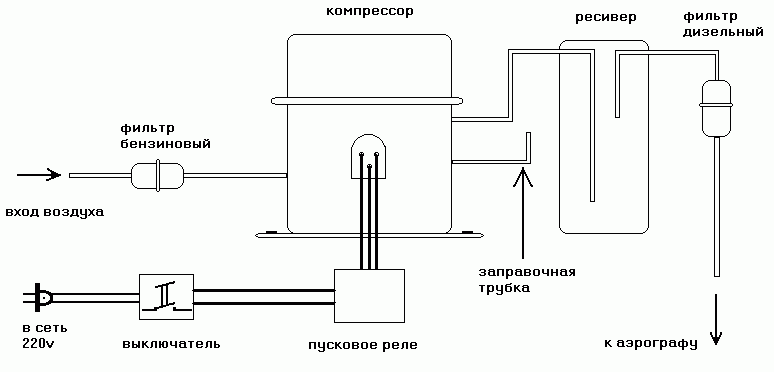
This scheme is intended for single-action airbrushes, such as our beloved "Eton" - he is also a Belarusian, or converted to single-acting double-acting airbrushes.
Of course, you can combine all this and leave it on the weight, but this design will constantly break and fall apart. I think if you spend a little effort and combine everything on any platform or in the case - it will be more reliable and will give more pleasure from work. I do not pretend to standardize, but my type of assembly absolutely does not require the use of machine tools, welding or a special tool. All materials are also available, and their cost is small. For the simplest and most reliable result, you can assemble the structure on a plywood sheet or chipboard. The dimensions of this sheet mainly depend on the type of receiver selected or mined. The receiver is needed for at least two functions - it smoothes out air pressure pulsations that are unavoidable during compressor operation, and serves as a trap for vapors and oil droplets. For inexpensive single-action airbrushes, which include the widely used “Eton” - he is also a Belarusian, a large-capacity receiver is absolutely unnecessary, a volume of about 1-2 liters is enough.
As practice shows, practically any hermetically sealed containers are used as a receiver - from plastic bottles for drinks and beer to industrial receivers from trucks and equipment. In my opinion, using plastic bottles and especially glass ones is somewhat unsafe, these materials do not have good mechanical strength, and even a small pressure in the receiver can break it if damaged and cause injury. Of course, you can use such things as a cylinder from a fire extinguisher, but this somewhat enlarges and makes the whole structure heavier.
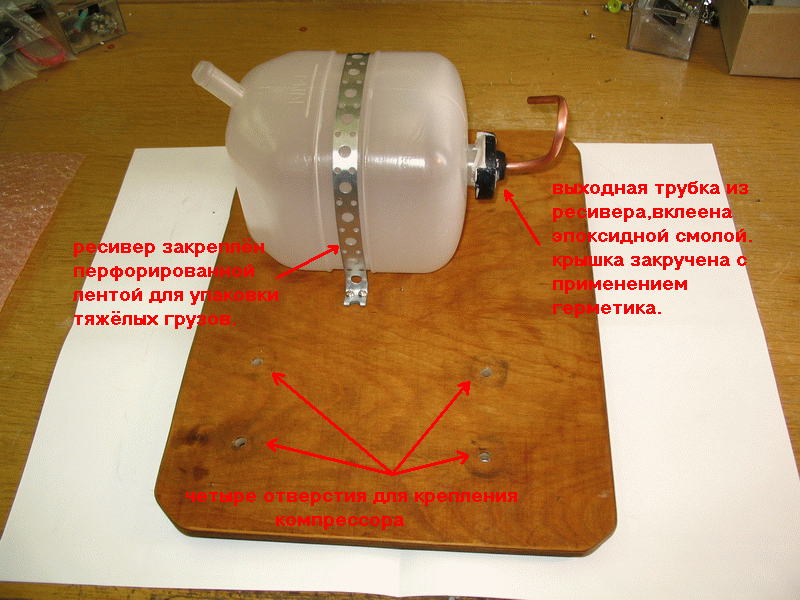
The most optimal containers for the receiver are small food canisters for water from translucent white polyethylene, or, as in my example, an expansion tank from the Lada. The polyethylene of which these containers are made, rather thick and viscous, is not afraid of mechanical damage from fallen small objects and retains its properties for a rather long time. Even if a break occurs, it does not produce fragments or scraps of material. For those who do not want to use such materials under pressure, I can advise you to take a closer look at small welded metal fuel cans with a volume of 5 liters.
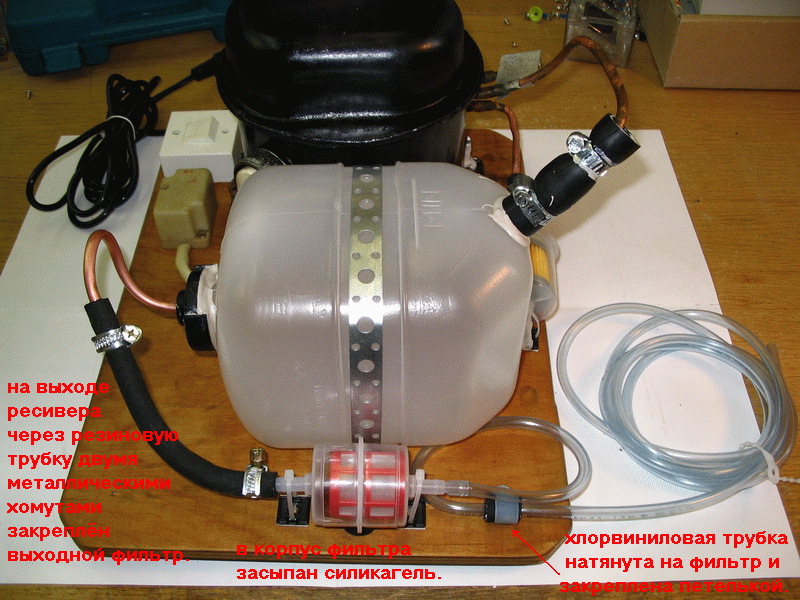
Adapting a canister or tank for the receiver is quite simple - you need to take 2 tubes, for example, copper, cut off from the compressor, about 15 cm long each.Do not forget that at least 10 cm long pipes must remain on the compressor. In the lid of the canister, 2 holes are drilled into which these tubes must fit tightly. Then, from the inside of the lid, the place where the tubes enter is filled with epoxy resin, you do not need to completely fill it, you still need to leave more space for screwing the neck. When everything dries up - you need to lubricate the neck and cork with sealant and tighten tightly. At this point, it is important to correctly place the tubes - their tips should not be near, and the outgoing tube should be higher than the incoming one (as in the diagram).
Now that everything is ready, you can figure out what sizes a plywood sheet is needed. Strongly tight-fitting should not be assembled, it will be more difficult to maintain, and the compressor should have some space around for air blowing and cooling. In my case, a piece of 30x40 cm was enough. Plywood should be taken with a thickness of at least 9 mm, fiberboard sheet - 15 mm. Trimming corners and processing with rough sand - it already tastes. But splinters in the fingers will not deliver pleasure.
At the corners of the sheet on its future lower part, it is necessary to fix with legs screws, rubber or, for example, corks from plastic bottles (a good reason to take 4 "one and a half" beer). The main thing is not to screw the screws through to the floor or table. Legs are necessary to reduce noise during compressor operation, prevent its “creep” from the spot, and scratching the floor is also unpleasant.
Then 4 holes are drilled for mounting the compressor, bolts, I hope you did not forget to bring along? Perhaps when using a thick sheet of plywood or chipboard, the length of regular bolts may not be enough, then you will have to buy longer ones, complete with nuts, in a hardware or auto store.
The hardest part is fixing the receiver. It must be installed first, so that the rest of the unit parts would not interfere later. It is not worth it to pierce the receiver through the fasteners, you need a creative approach - for example, use a rubber tube or strip, strong fabric or leather, perforated tape for packing heavy loads, etc. One edge of the fastening tape is screwed onto the plywood with a screw, throws it through the receiver and is tightened on the other side.
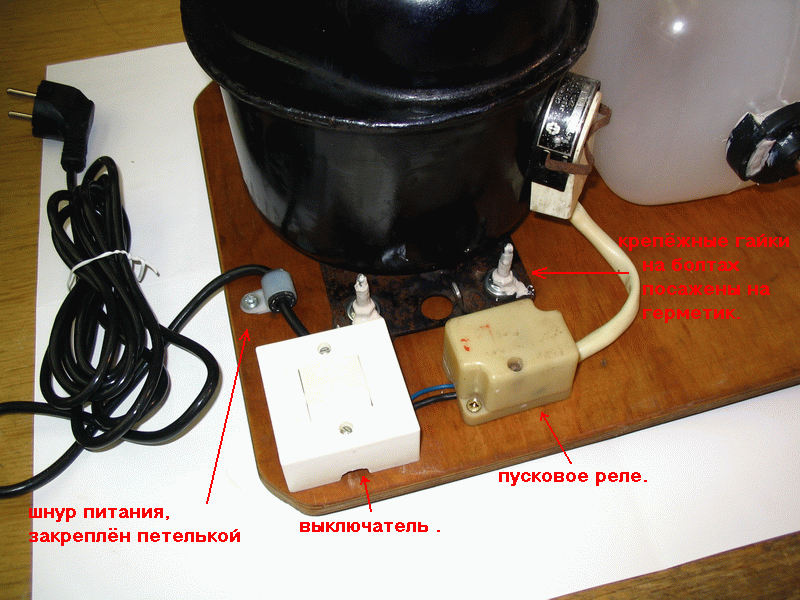
The compressor is bolted, preferably by pipes to the edge of the plywood sheet, so it will be easier to change the oil later on. When screwing, it is advisable to lubricate the threads of the bolts with sealant, so they will subsequently not be unscrewed due to vibration. Next to it we screw on the start relay with the screws, correctly orienting it. Next - the light switch, on its contacts we connect the relay and the power cord. It is advisable to fix the cord itself with a collar or eyelet to the plywood sheet, so it will not break out of the switch.
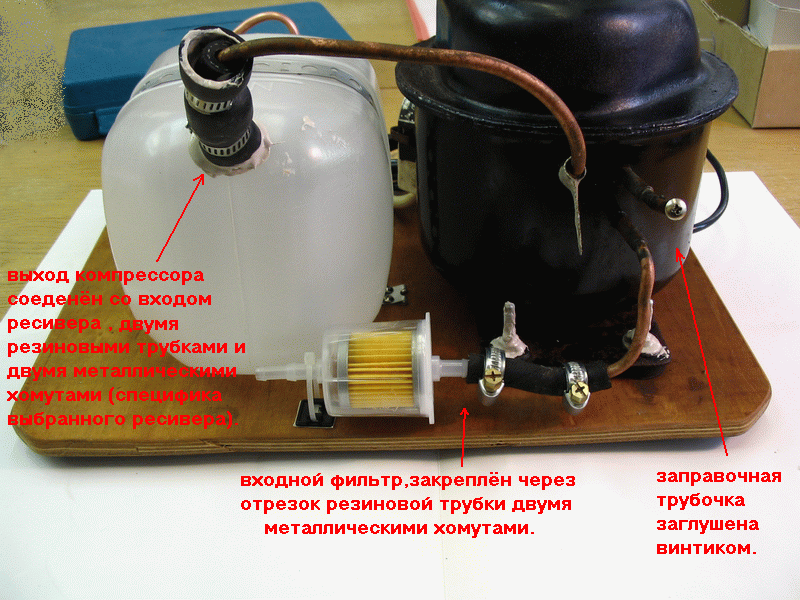
When it’s finished with the electric part, we proceed with the installation of the rest of the pneumatic system. At the compressor inlet, using a piece of rubber tube and 2 clamps, we fix a fine filter for gasoline. Perhaps, this part will seem superfluous to someone, but it is not expensive, and all kinds of dust will not get into the compressor, then it can no longer be removed from there. The main thing in all subsequent operations is not to fill this filter with oil, it will lose its properties from this. Next, a piece of rubber tube and 2 clamps connect the compressor output to the receiver input. It is necessary to act carefully so as not to break the tubes out of the lid. At the output of the receiver, we also stretch the rubber tube with 2 clamps, fix the filter for diesel fuel. This filter can be filled with silica gel, then it will perform 2 functions - a moisture trap and an adapter for fixing the rubber and vinyl chloride tubes. Of course, you can do without it, pull the vinyl tube directly to the receiver's output, but such a connection will not be completely tight and durable, the hose will break off the smooth copper tube.
A vinyl tube is usually smaller in diameter than the nozzle of the filter and airbrush; it does not stretch very well, and it is rather difficult to fit it. There is a little trick for this - the tip of the tube is immersed in solvent 647 for several minutes. Shallow, more than 5 mm is not worth it, otherwise it will be too flexible, and there will be no emphasis for pushing it onto the fitting.It is advisable to fix the filter and the vinyl tube on a plywood sheet, so it will not hang out and loosen the receiver tubes.

Well, that's almost it. You can turn on, listen to the hiss of air. Just rush right into the work is not worth it, if silicone sealant was used - it needs to dry for a couple of days.
Chapter Three: Exploitation.
There is nothing complicated here. The main thing when operating the compressor is to prevent it from overheating. Typically, the compressor is heated to a temperature of 40-45C for 25-30 minutes of continuous operation. It’s not worth working longer, it may already reflect badly on its resource and quality of work.
For future use, you may need to adjust the air pressure. For example, some types of compressors can give out much more air than is necessary for an airbrush, or this is due to paint moments. In this case, the compressor will create unnecessarily high pressure in the tubes, filters and receiver, and it will also work with overload and quickly heat up. In this case, we need a gearbox. The most important thing is that the gearbox in this system must be installed at the INPUT of the compressor, if it is installed at the output, this will also cause the compressor to overload and quickly heat up.
By installing a reducer at the inlet, we limit the amount of air passing through the compressor, thereby regulating the pressure. The simplest and most affordable gearbox are calibrated tubes, which can be fixed to the inlet of the filter through a rubber tube, for example from the pens of fountain pens, or thick needles from syringes. You can drill yourself with different drills. Or you can visit the nearest pet store, in the products for the aquarium you can find very suitable small faucets and gearboxes. And in terms of landing diameters, they are just worth a penny. Unlike calibrated tubes, they will allow you to adjust the pressure within certain limits as you work.
Chapter Four: Maintenance.
Compressor maintenance is not difficult, although some parts will have to be partially removed for this. Of course, you don’t have to service the unit at all, but believe me - it will answer the same.
The service includes:
Oil change.
Filter replacement.
Drain accumulated oil from the receiver.
Oil, no matter how good it is, still loses its properties and becomes contaminated over time. It is advisable to change the oil at least once a year in the compressor, regardless of the mode and the amount of its operating time.
To do this, it is necessary to remove all tubes from it, unscrew the plug - screw from the filling tube, and tilt the compressor to pour all the oil out of it. Remember - after that you can’t turn it on in any case! Next, as with the first oil change, pour the necessary amount of oil inside with a syringe. While the tubes are removed - you can at the same time remove the old filters, pour out the accumulated oil from the receiver. It is not worth pouring this oil back into the compressor.
Then install all the new filters in place, return the tubes back to the compressor. Metal clamps help well in this, they allow you to repeatedly carry out such operations.
Well, that’s all, good work. I think the additional questions that have arisen can be resolved on the forum.